[Container] 쿠버네티스 - 1
쿠버네티스
- 가상머신 준비
cpu(vt) mem 프로그램 centos8 2 4 master ip : 192.168.197.100 centos8 2 4 node1 ip : 192.168.197.110 centos8 2 4 node2 ip : 192.168.197.120 - 네트워크 연동(master, node1, node2)
vi /etc/hosts# 맨 밑에 추가 192.168.197.100 master 192.168.197.110 node1 192.168.197.120 node2쿠버네티스 설치 및 설정
공용(master, node1, node2)
- 방화벽 설정 ```shell firewall-cmd –permanent –add-port=6443/tcp firewall-cmd –permanent –add-port=2379-2380/tcp firewall-cmd –permanent –add-port=10250/tcp firewall-cmd –permanent –add-port=10251/tcp firewall-cmd –permanent –add-port=10252/tcp firewall-cmd –permanent –add-port=10255/tcp firewall-cmd –reload modprobe br_netfilter echo ‘1’ > /proc/sys/net/bridge/bridge-nf-call-iptables
setenforce 0
sed -i –follow-symlinks ‘s/SELINUX=enforcing/SELINUX=disabled/g’ /etc/sysconfig/selinux
init 6 # 재시작
- 도커 설치
```shell
yum install -y yum-utils
yum-config-manager --add-repo https://download.docker.com/linux/centos/docker-ce.repo
yum-config-manager --enable docker-ce-nightly
yum-config-manager --enable docker-ce-test
yum install -y docker-ce docker-ce-cli containerd.io --allowerasing

mkdir /etc/docker

cat <<EOF | sudo tee /etc/docker/daemon.json
{
"exec-opts": ["native.cgroupdriver=systemd"],
"log-driver": "json-file",
"log-opts": {
"max-size": "100m"
},
"storage-driver": "overlay2"
}
EOF

systemctl daemon-reload
systemctl restart docker
systemctl enable docker
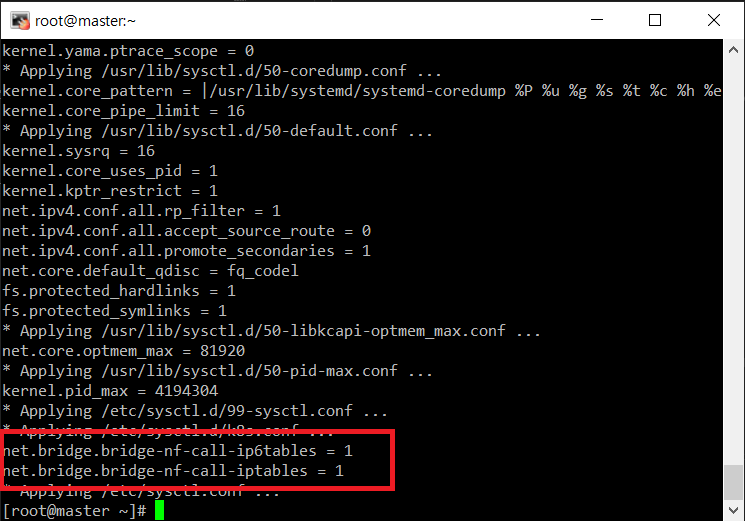
- k8s 설치 ```shell firewall-cmd –add-masquerade –permanent firewall-cmd –reload
cat «EOF > /etc/sysctl.d/k8s.conf net.bridge.bridge-nf-call-ip6tables = 1 net.bridge.bridge-nf-call-iptables = 1 EOF
sysctl –system # 위의 명령어가 제대로 기입됐는지 확인
<br/>
```shell
cat <<EOF > /etc/yum.repos.d/kubernetes.repo
[kubernetes]
name=Kubernetes
baseurl=https://packages.cloud.google.com/yum/repos/kubernetes-el7-x86_64
enabled=1
gpgcheck=1
repo_gpgcheck=1
gpgkey=https://packages.cloud.google.com/yum/doc/yum-key.gpg https://packages.cloud.google.com/yum/doc/rpm-package-key.gpg
EOF
# 쿠버네티스 1.22.5 버전 다운
dnf install -y kubelet-1.22.5 kubeadm-1.22.5 kubectl-1.22.5 --disableexcludes=kubernetes
systemctl enable kubelet
systemctl start kubelet
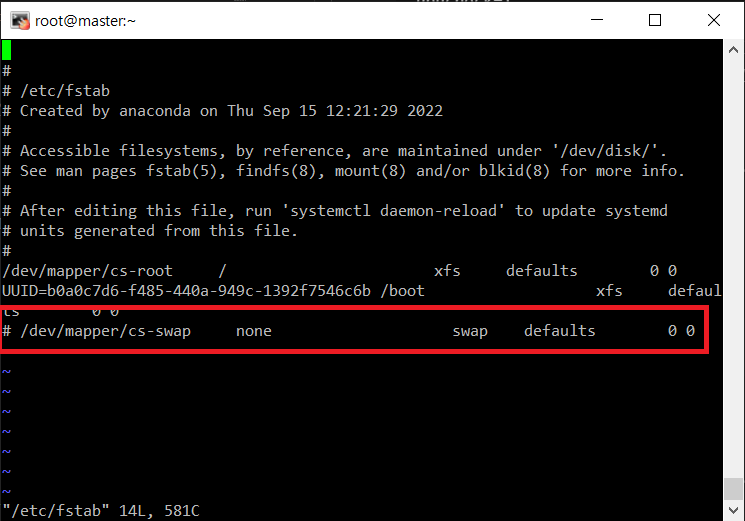
- k8s swap 설정 ```shell swapoff -a
vi /etc/fstab #/dev/mapper/cl-swap none swap defaults 0 0 주석 처리해야 함
<br/>
### master 설정
```shell
kubeadm init --pod-network-cidr 192.168.1.0/24
# 만약 에러가 나면 명령어 kubeadm reset 입력해서 리셋 후 다시 시작한다.
#나오는 명령어 따로 저장해둔다. 노드 연결할때 쓰는 명령어로 사람마다 다름 master에서 실행x
kubeadm join 192.168.197.100:6443 --token 5b2pjz.sf4632azhzpcp7f7 \
--discovery-token-ca-cert-hash sha256:a624bb31c56ec6595a9c8adfe4a7ce5721aae18bd78150ac457bc6f5ca109b20
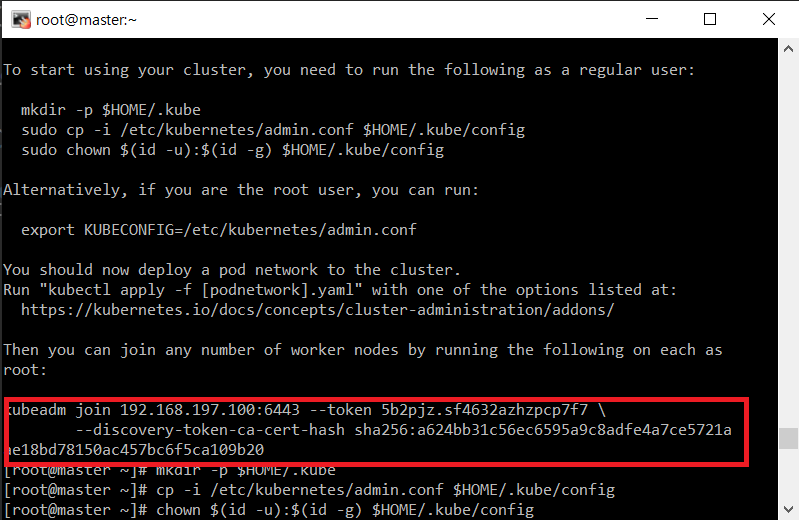
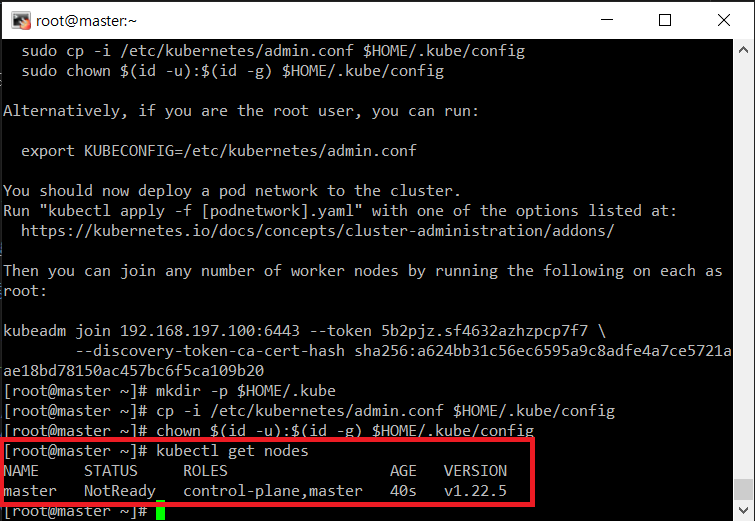
mkdir -p $HOME/.kube
cp -i /etc/kubernetes/admin.conf $HOME/.kube/config
chown $(id -u):$(id -g) $HOME/.kube/config

kubectl get nodes
- 컨테이너 네트워크 설정
dnf -y install wget
wget https://docs.projectcalico.org/manifests/calico.yaml
vi calico.yaml  # 4551, 4552번째 줄, 주석 제거하고 줄 맞추기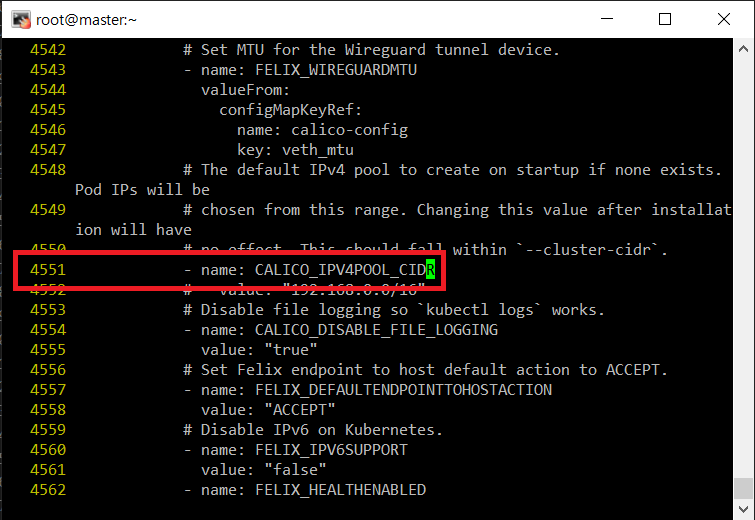

kubectl apply -f calico.yaml # 설정 끝난 yaml파일 실행
node 설정
- 방화벽 설정
firewall-cmd --zone=public --permanent --add-port={10250,30000-32767}/tcp firewall-cmd --reload - master와 연결
kubeadm join 192.168.197.100:6443 --token 5b2pjz.sf4632azhzpcp7f7 \
      --discovery-token-ca-cert-hash sha256:a624bb31c56ec6595a9c8adfe4a7ce5721aae18bd78150ac457bc6f5ca109b20  #사람마다 다름
확인(master)
- 컨테이너 확인
kubectl get pod -n kube-system # 다 Running 뜨는지 확인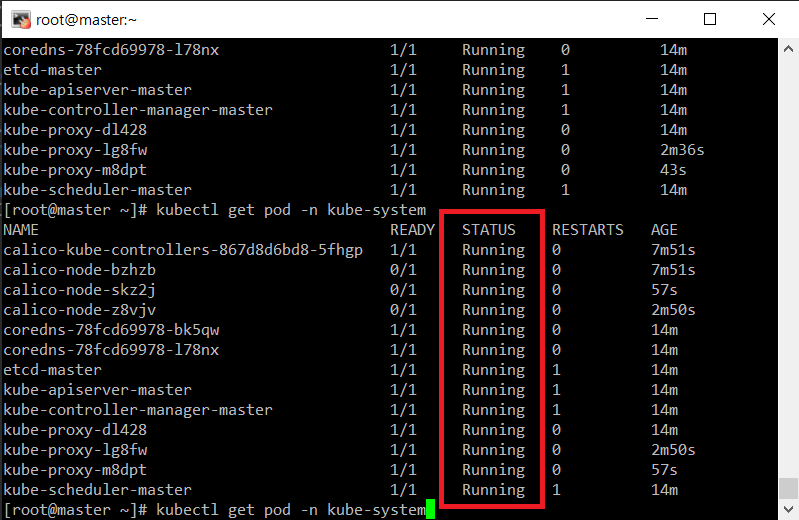
- 노드 연결 확인
kubectl get nodes # 다 Ready뜨는지 확인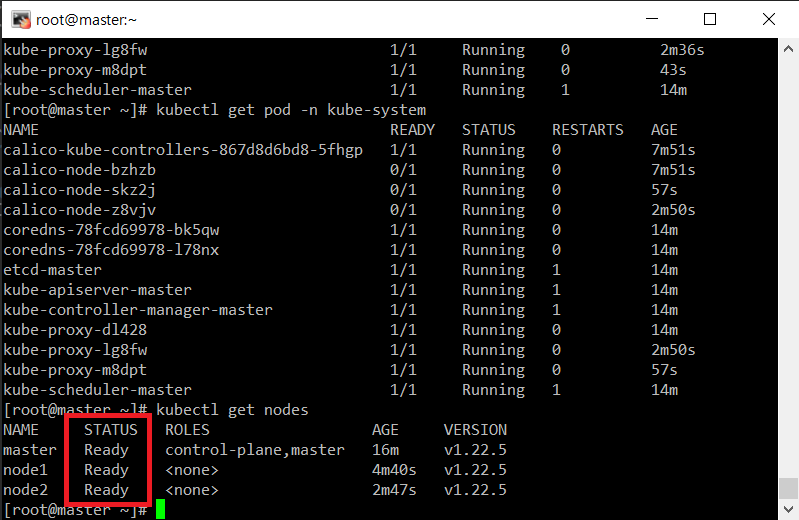
설정을 다 했으면 스냅샷을 남겨 백업해둔다.
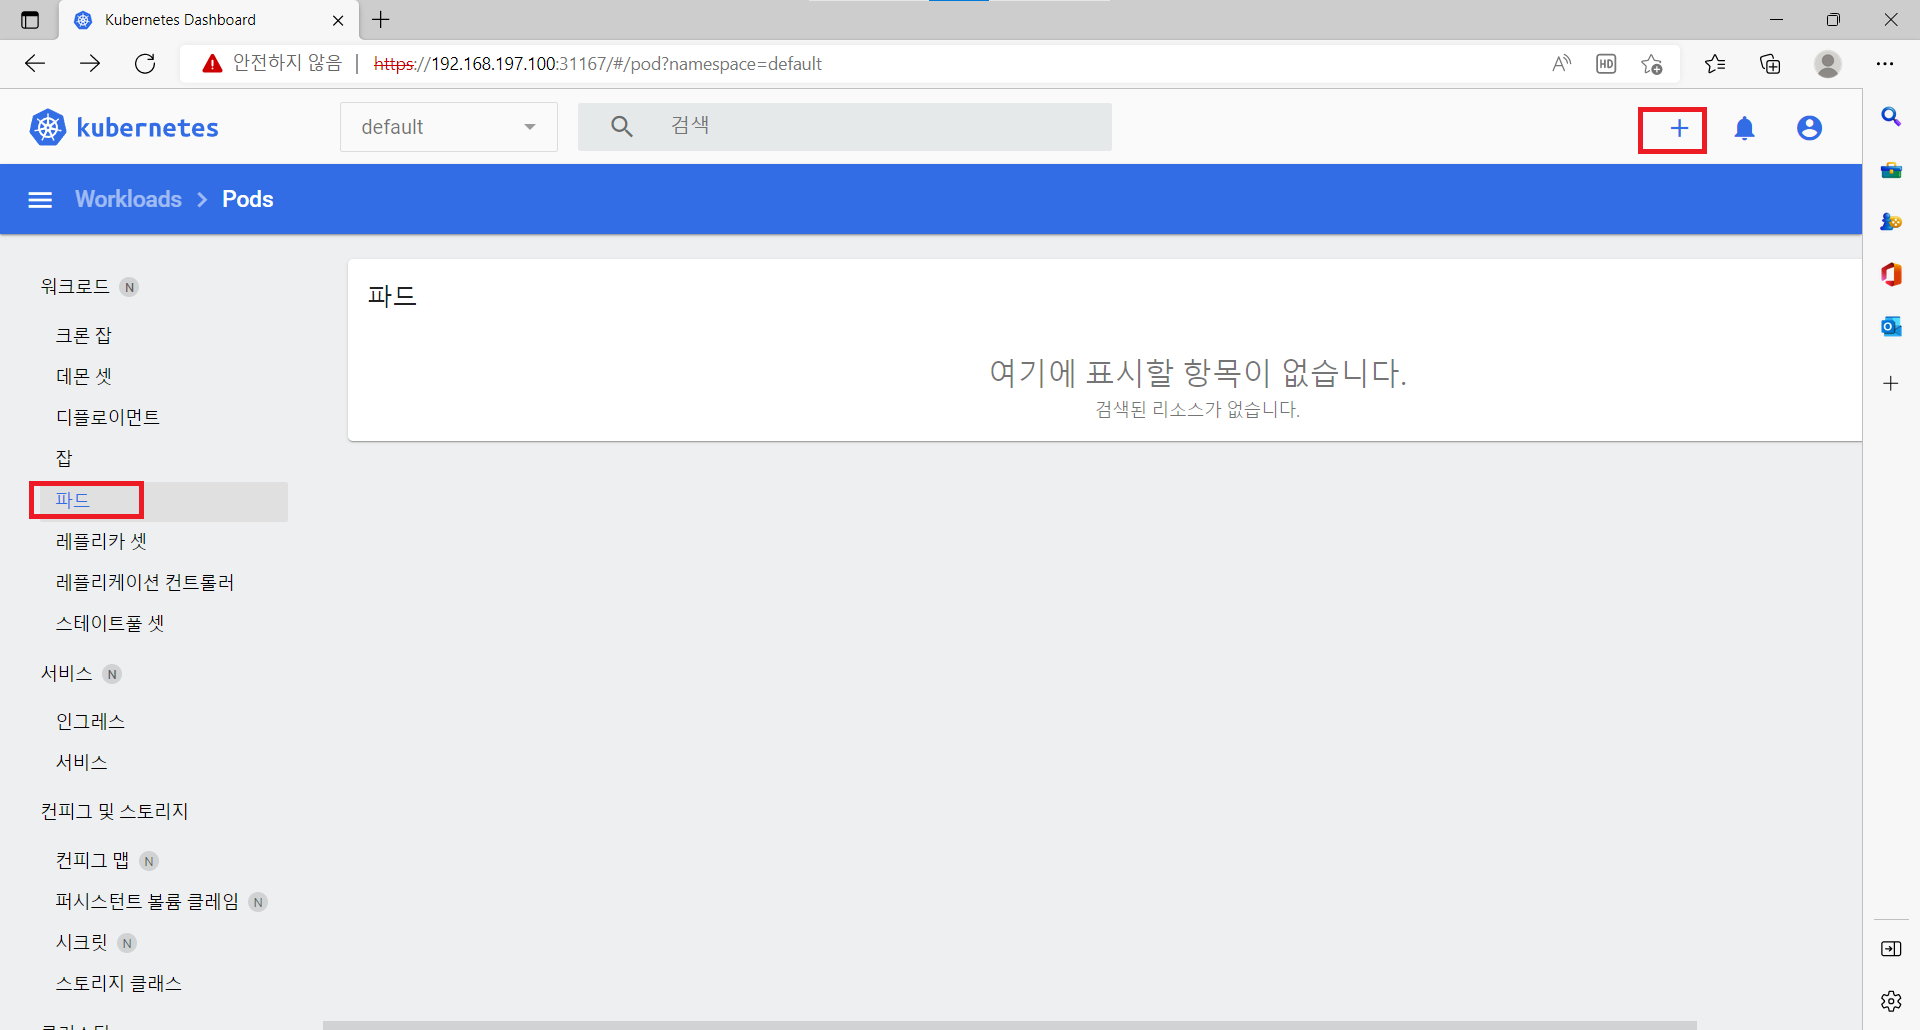
Pod
- 파드는 컨테이너를 하나 이상 모아 놓은 것, 쿠퍼네티스에서는 최소단위
- 매니페스트
매니페스트란 쿠버네티스의 오브젝트를 생성하기 위한 메타 정보를 YAML이나 JSON으로 기술한 파일
- 매니페스트
- YAML 파일
키: 값 형태로 작성하는 파일
대시보드 설정
master
wget https://raw.githubusercontent.com/kubernetes/dashboard/v2.5.0/aio/deploy/recommended.yaml
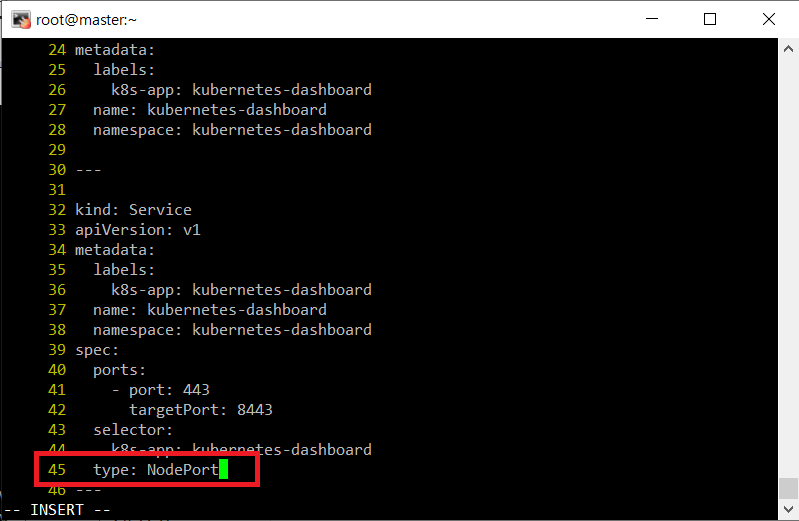
vi recommended.yaml
39 spec:
40   ports:
41     - port: 443
42       targetPort: 8443
43   selector:
44     k8s-app: kubernetes-dashboard
45   type: NodePort     #여기 추가
- yaml 파일 실행
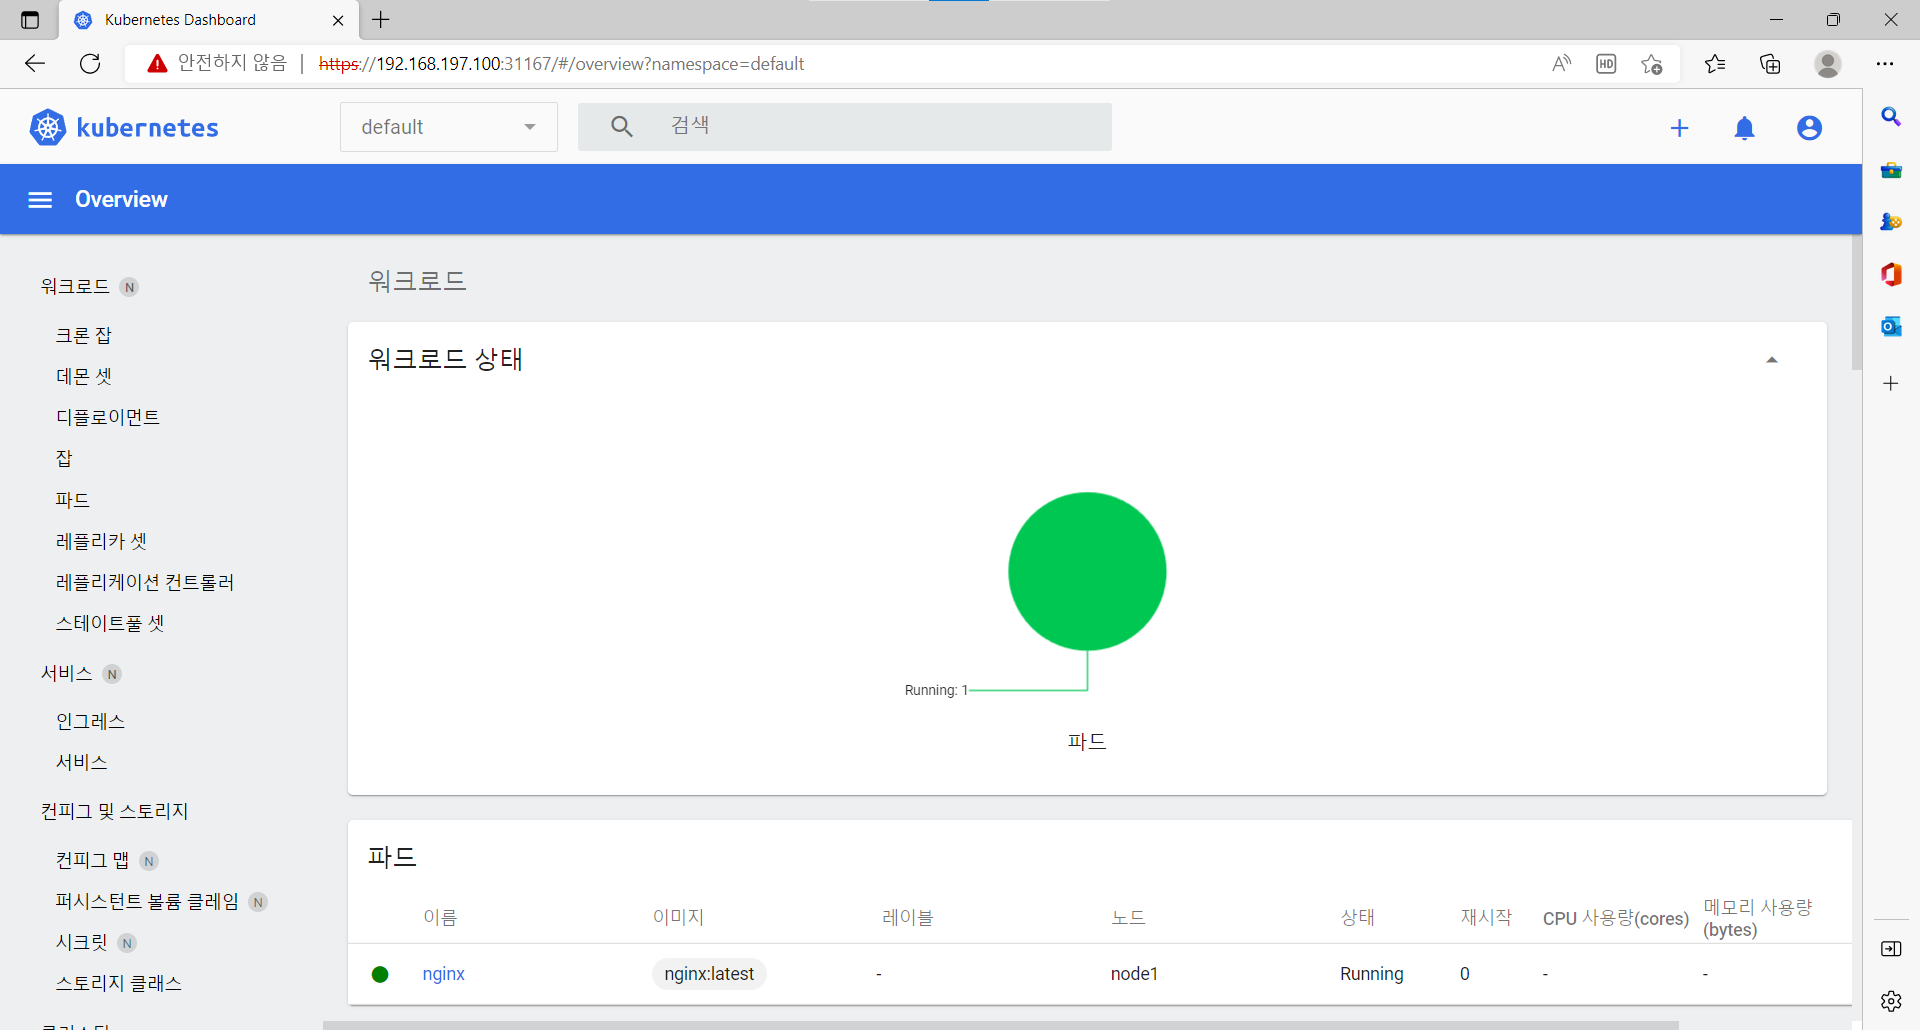
kubectl apply -f recommended.yaml
kubectl get pods -A # 대시보드 파드가 있는지 확인, 없으면 kubectl delete -f recommended.yaml 입력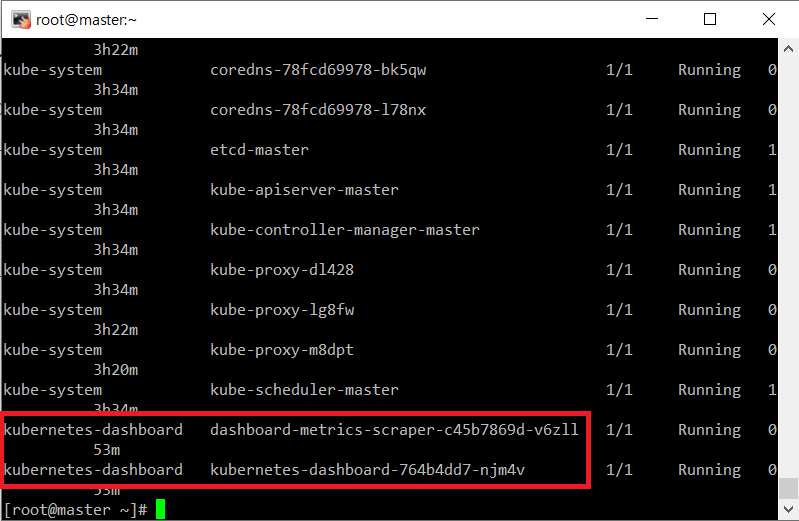
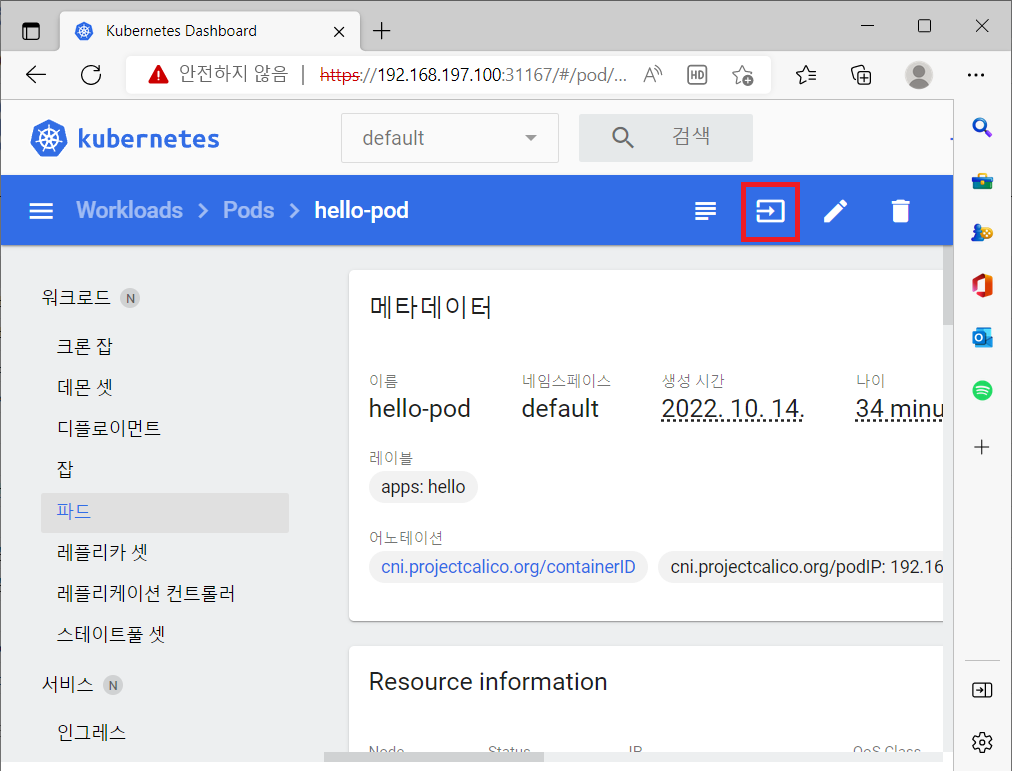
- 대시보드 포트번호 확인
kubectl get services -n kubernetes-dashboard # 포트번호 확인 사람마다 다름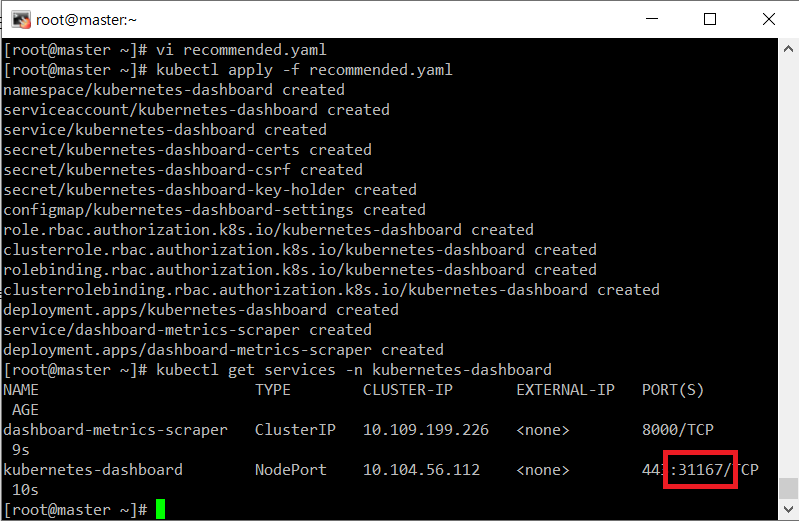
- 방화벽 설정 ```shell firewall-cmd –permanent –add-port=31167/tcp firewall-cmd –reload
systemctl stop firewalld systemctl disable firewalld setenforce 0 # 모든 노드에 적용
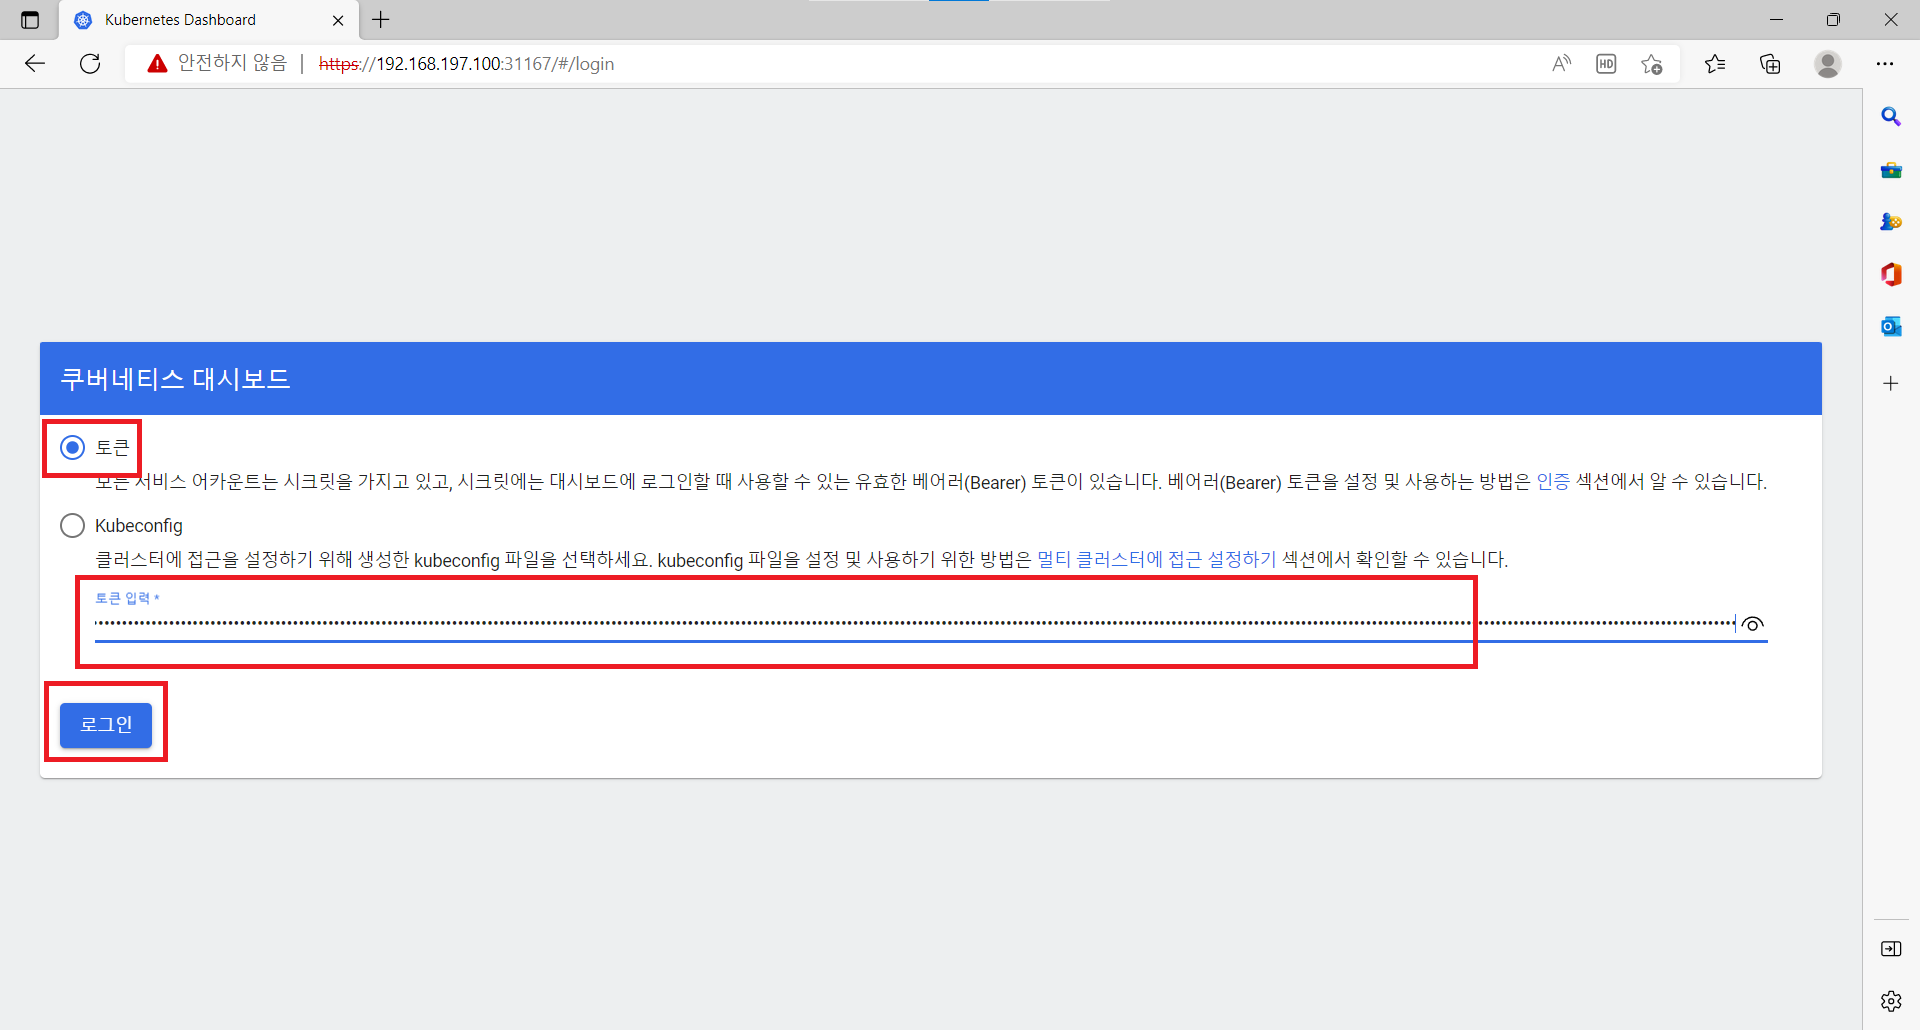
- 웹 브라우저로 https://마스터노드IP:확인한포트번호 접속<br/>
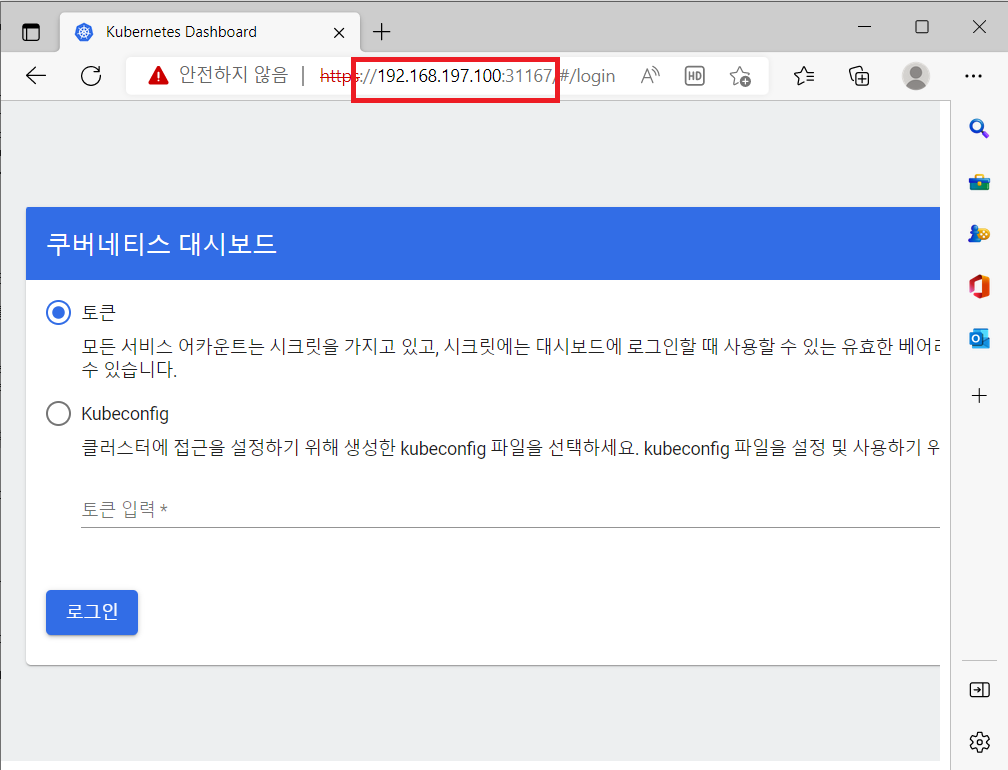<br/>
- 토큰 번호 확인(master)<br/>
```shell
cat <<EOF | kubectl create -f -
apiVersion: v1
kind: ServiceAccount
metadata:
name: admin-user
namespace: kube-system
EOF
cat <<EOF | kubectl create -f -
apiVersion: rbac.authorization.k8s.io/v1
kind: ClusterRoleBinding
metadata:
name: admin-user
roleRef:
apiGroup: rbac.authorization.k8s.io
kind: ClusterRole
name: cluster-admin
subjects:
- kind: ServiceAccount
name: admin-user
namespace: kube-system
EOF
kubectl -n kube-system describe secret $(kubectl -n kube-system get secret | grep admin-user | awk '{print $1}')
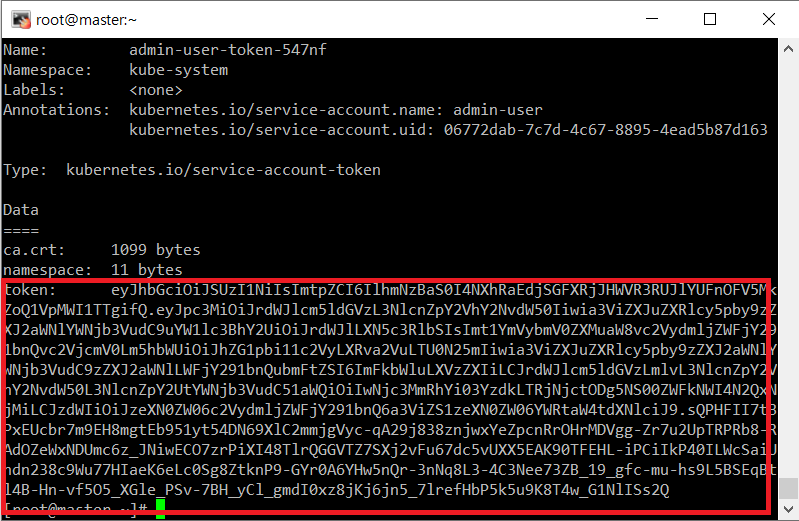
띄어쓰기 없이 토큰만 복사 후
대시보드 설정 끝
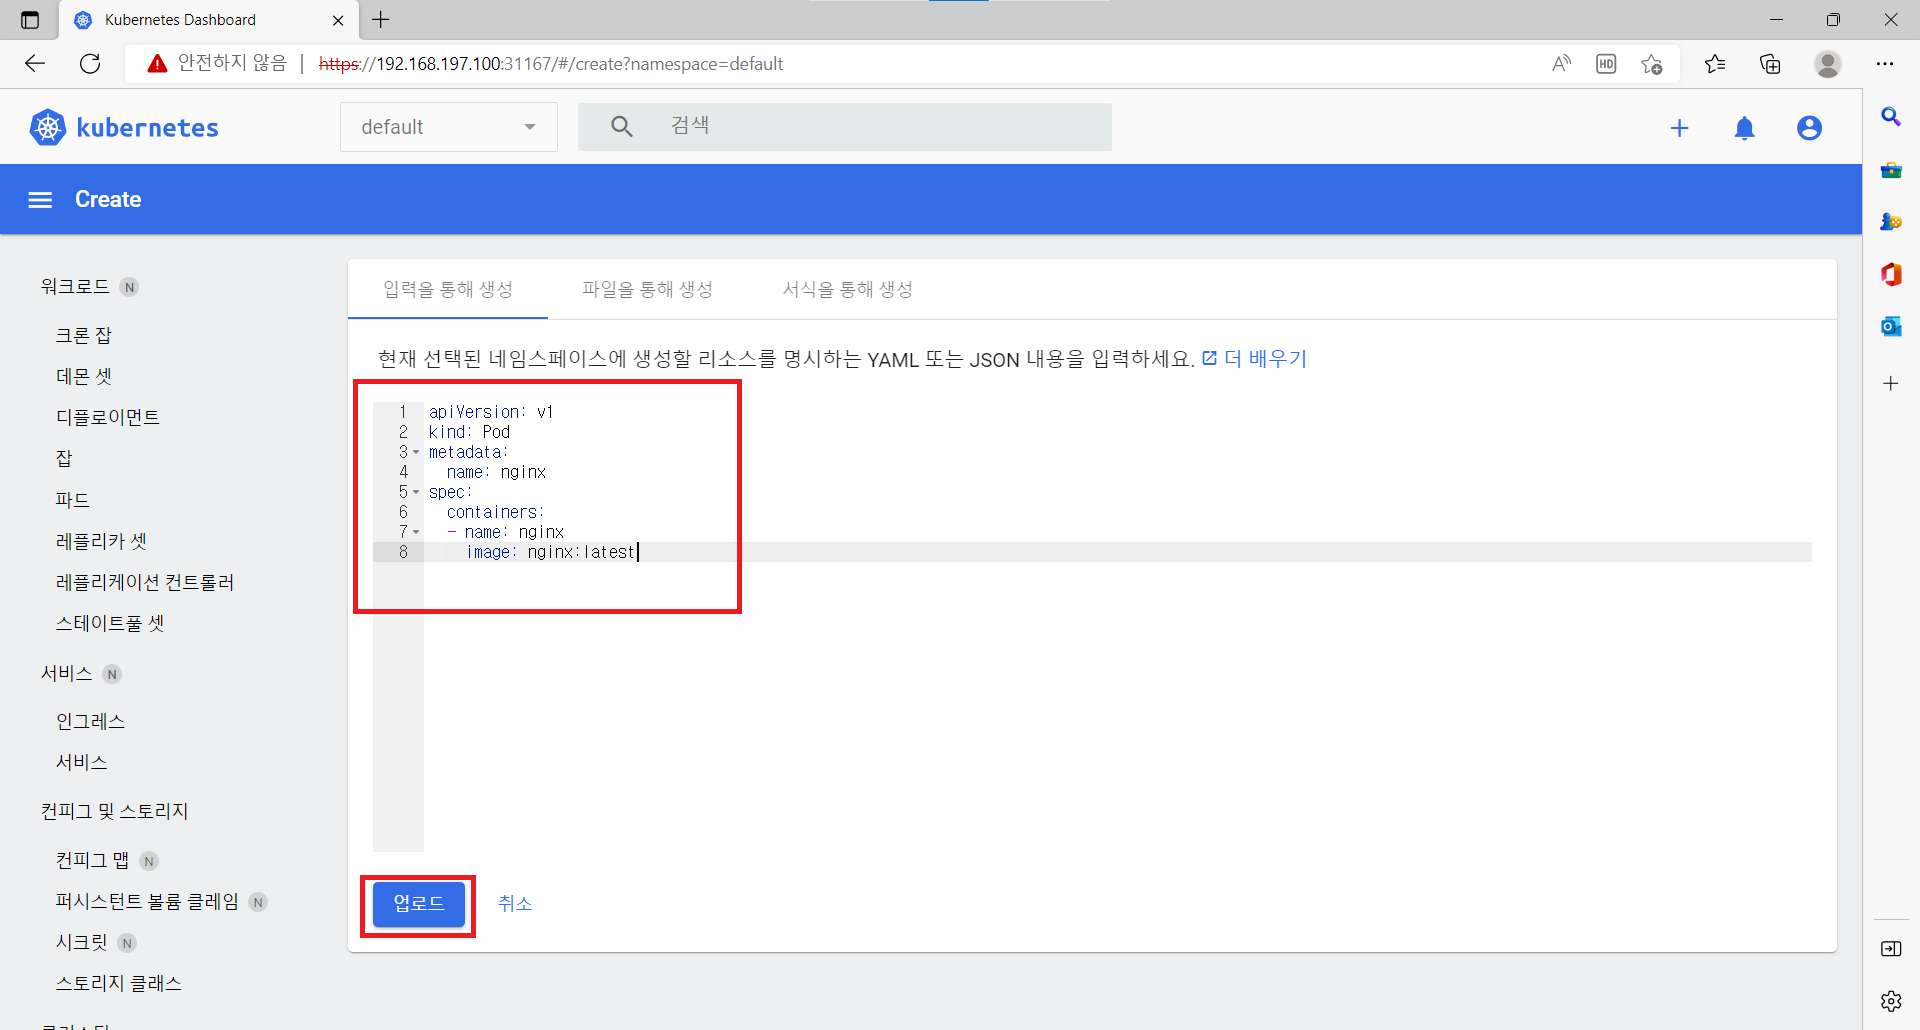
- 대시보드 파드 추가 하기
- 코드 추가 ```yaml apiVersion: v1 kind: Pod metadata: name: nginx spec: containers:
- name: nginx
image: nginx:latest
```
실습
mkdir test
cd test
vi Dockerfile
Dockerfile
FROM  node:slim
ADD ./hello.js /hello.js
EXPOSE 8000
CMD node /hello.js
vi hello.js
hello.js
var http = require('http');
var content = function(req, resp) {
 resp.end("Hello Kubernetes!" + "\n");
 resp.writeHead(200);
}
var w = http.createServer(content);
w.listen(8000);
docker login # 내 도커 허브 아이디와 비밀번호 후 hello 디렉토리 생성
docker build --tag xc7230/hello:0.1 .
docker push xc7230/hello:0.1
- 파드 추가
```yaml
apiVersion: v1
kind: Pod
metadata:
name: hello-pod
label:
app: hello
spec:
containers:
- name: hello-container1
image: xc7230/hello:0.1
port:
- containerPort: 8000
```


- containerPort: 8000
```
- name: hello-container1
image: xc7230/hello:0.1
port:
- 2개 해보기
DockerfileFROM node:slim ADD ./hello.js /hello.js EXPOSE 9000 CMD node /hello.jshello.jsvar http = require('http'); var content = function(req, resp) { resp.end("Hello Kubernetes!" + "\n"); resp.writeHead(200); } var w = http.createServer(content); w.listen(9000); - 도커 허브에 업로드
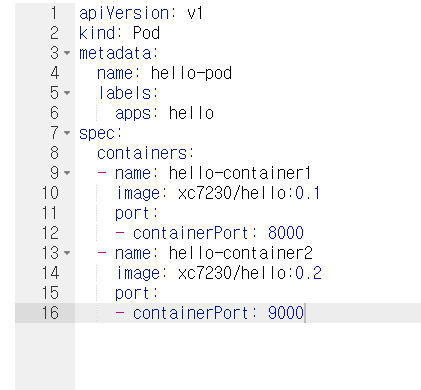
docker build --tag xc7230/hello:0.2 . docker push xc7230/hello:0.2 - 파드 생성하기
```yaml
apiVersion: v1
kind: Pod
metadata:
name: hello-pod
labels:
apps: hello
spec:
containers:
- name: hello-container1
image: xc7230/hello:0.1
port:
- containerPort: 8000
- name: hello-container2
image: xc7230/hello:0.2
port:
- containerPort: 9000 ```
- name: hello-container1
image: xc7230/hello:0.1
port:
-
확인

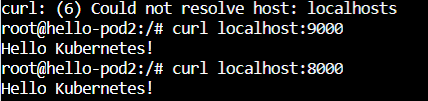
- 컨테이너 확인
컨테이너의 콘솔로 진입
apt update
apt install -y curl
curl localhost:8000
curl localhost:9000
레이블
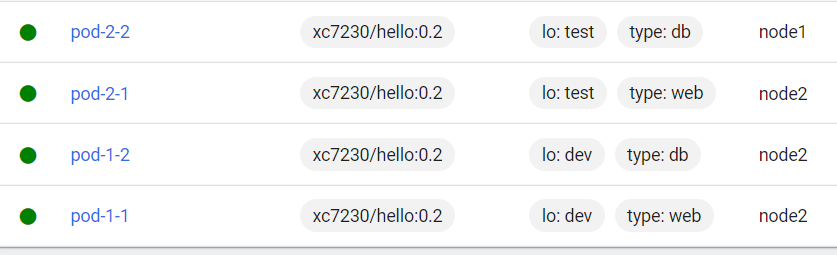
- 파드에 레이블 달기
```yaml apiVersion: v1 kind: Pod metadata: name: pod-1-1 labels: type: web lo: dev spec: containers:- name: hello-container2
image: xc7230/hello:0.2
port:
- containerPort: 9000
레이블만 바꿔서 만들어 보기<br/>type: web lo: dev
- containerPort: 9000
- name: hello-container2
image: xc7230/hello:0.2
port:
type: db lo: dev
type: web lo: test
type: db lo: test
<br/>
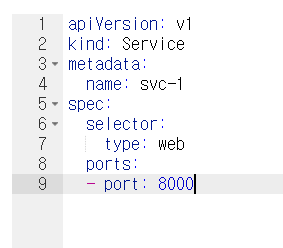
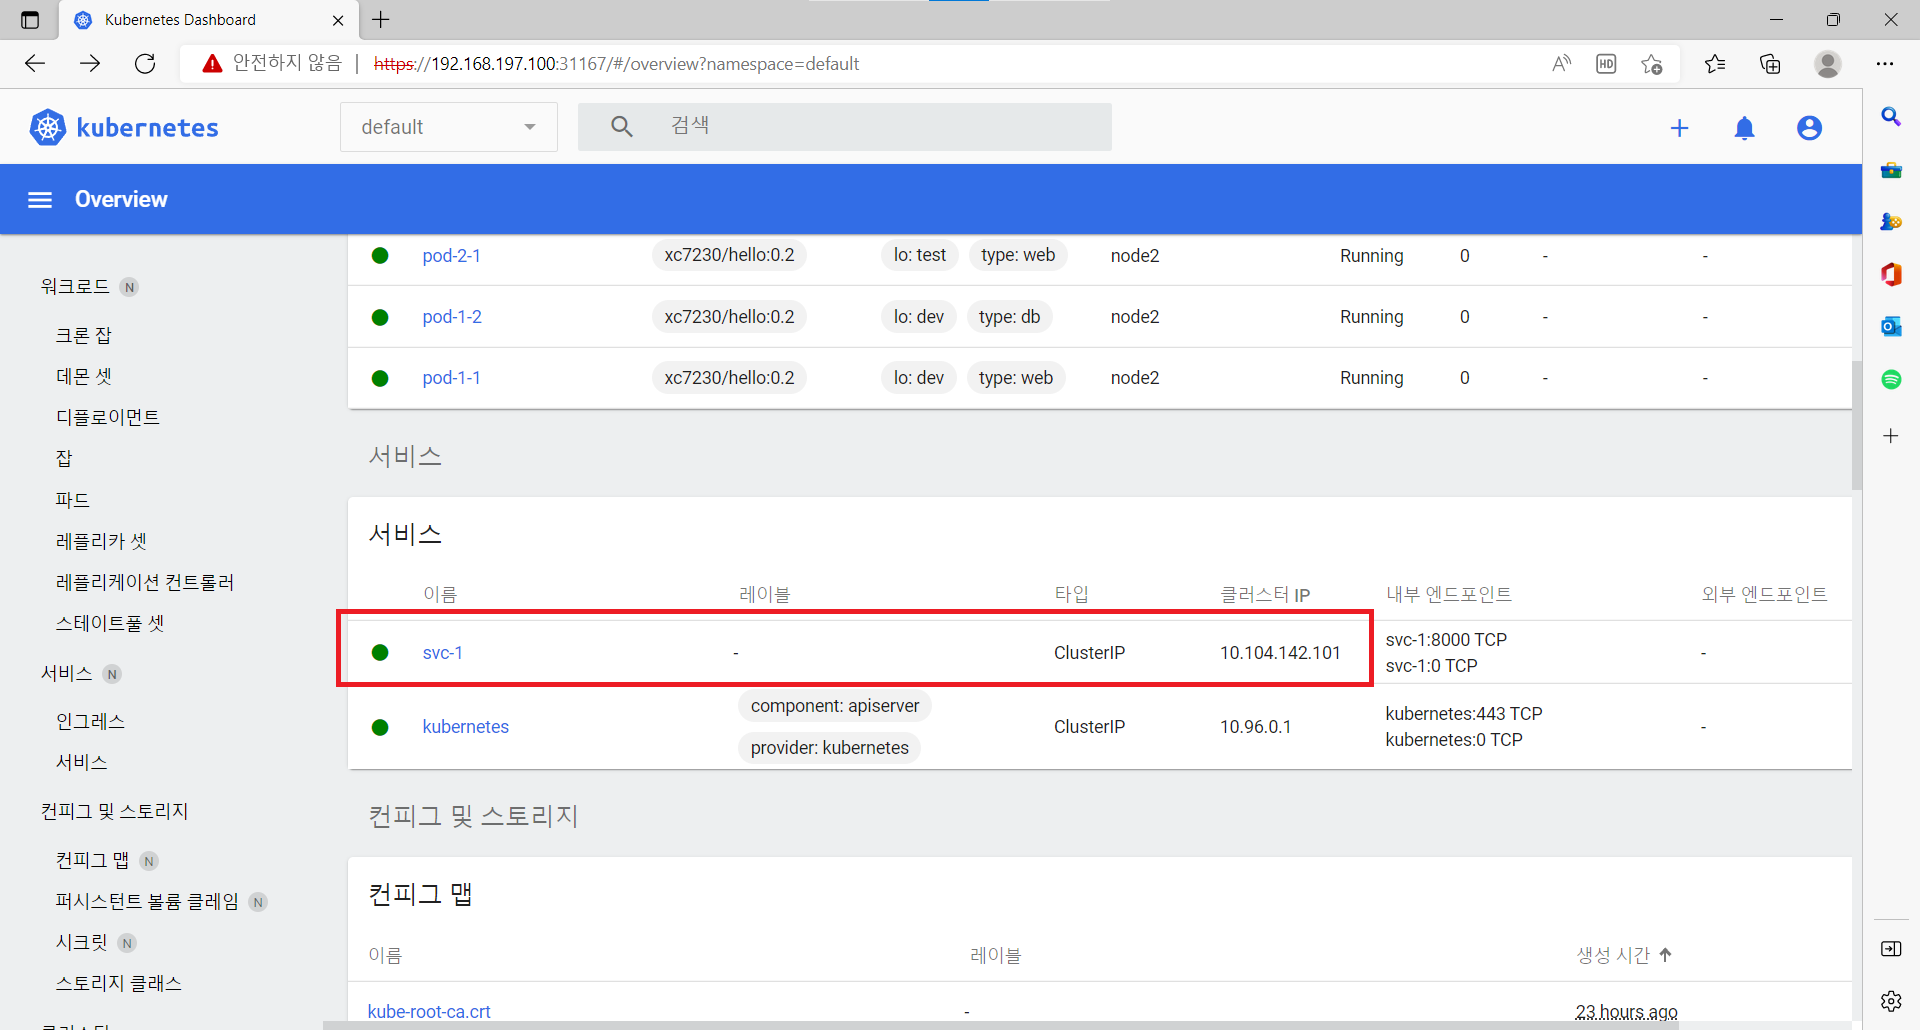
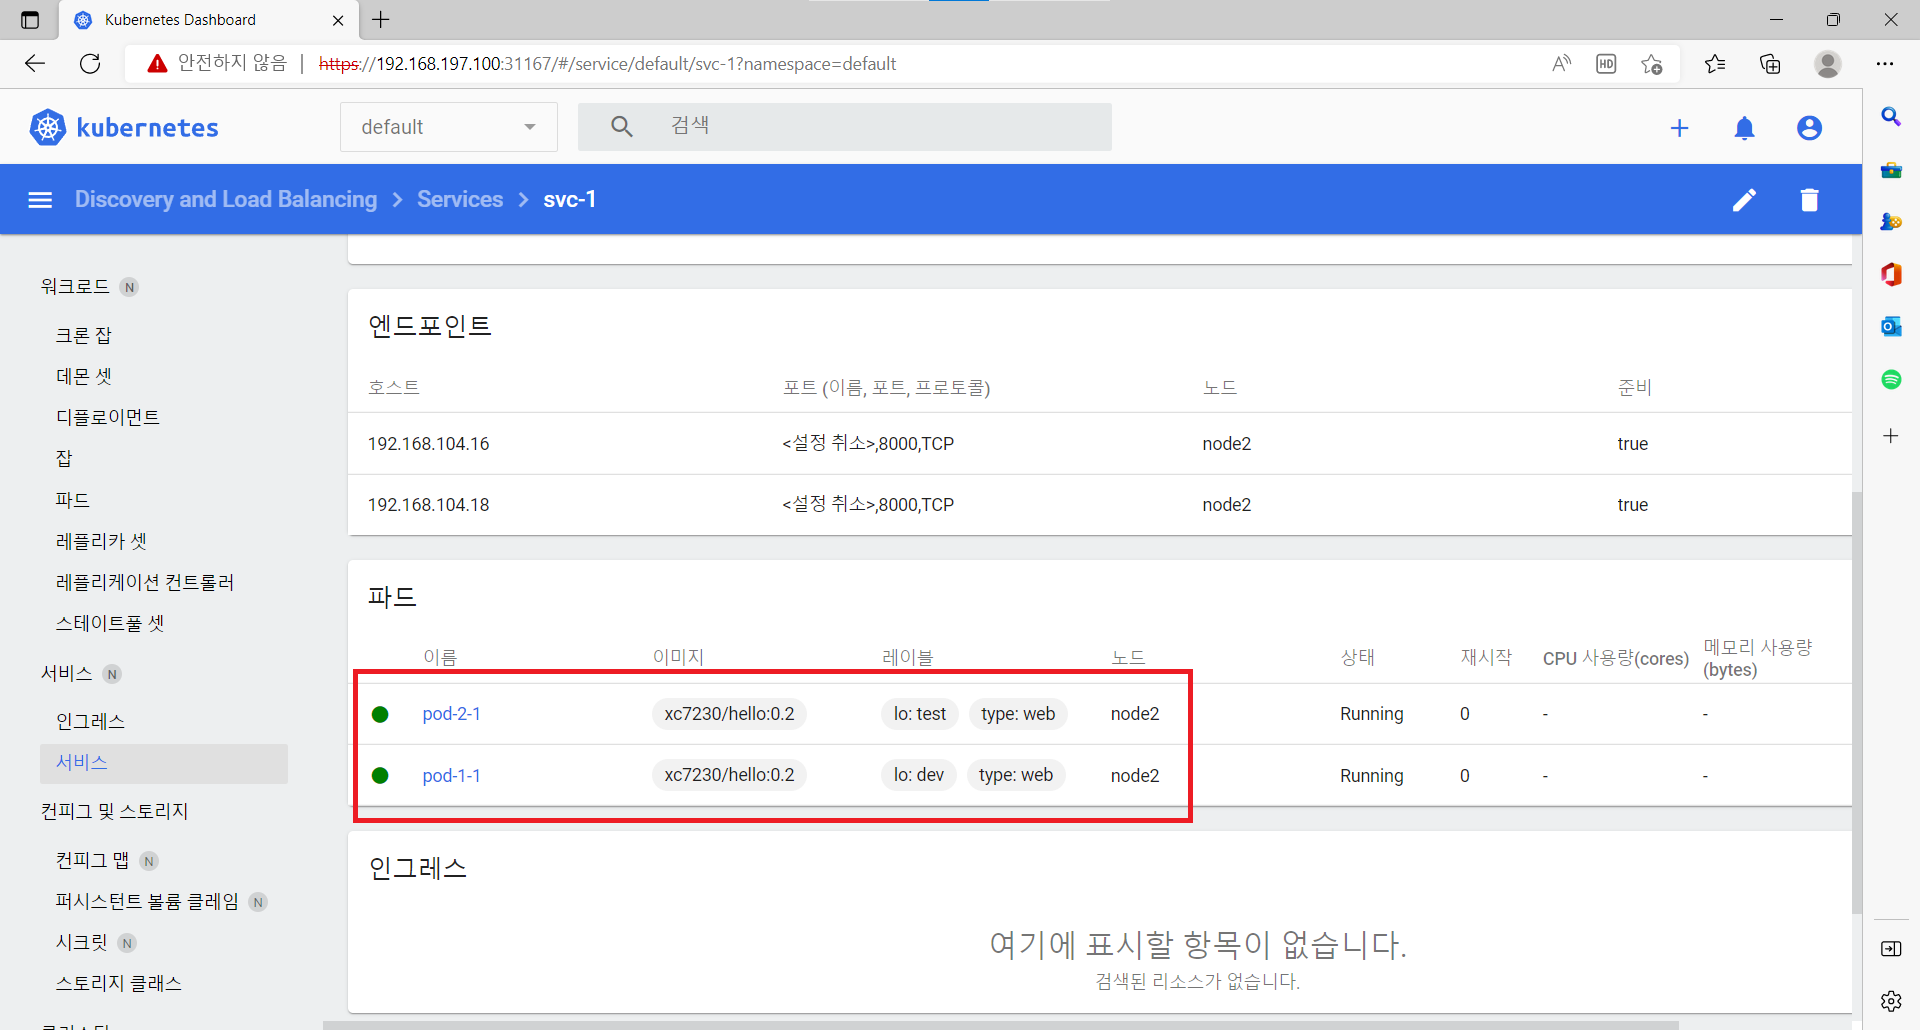
- 만들어진 파드 서비스 하기<br/>
```yaml
apiVersion: v1
kind: Service
metadata:
name: svc-1
spec:
selector:
type: web
ports:
- port: 8000
- 확인
노드 스케줄러
원하는 노드에 파드를 만들 수 있다.
apiVersion: v1
kind: Pod
metadata:
  name: pod-3-1
spec:
  nodeSelector:
    kubernetes.io/hostname: node1
  containers:
  - name: container
    image: xc7230/hello:0.2

하나의 노드를 지정해서 계속 파드를 생성하며 부하를 주면 작동이 멈춘다.
QoS(Quality of Service)
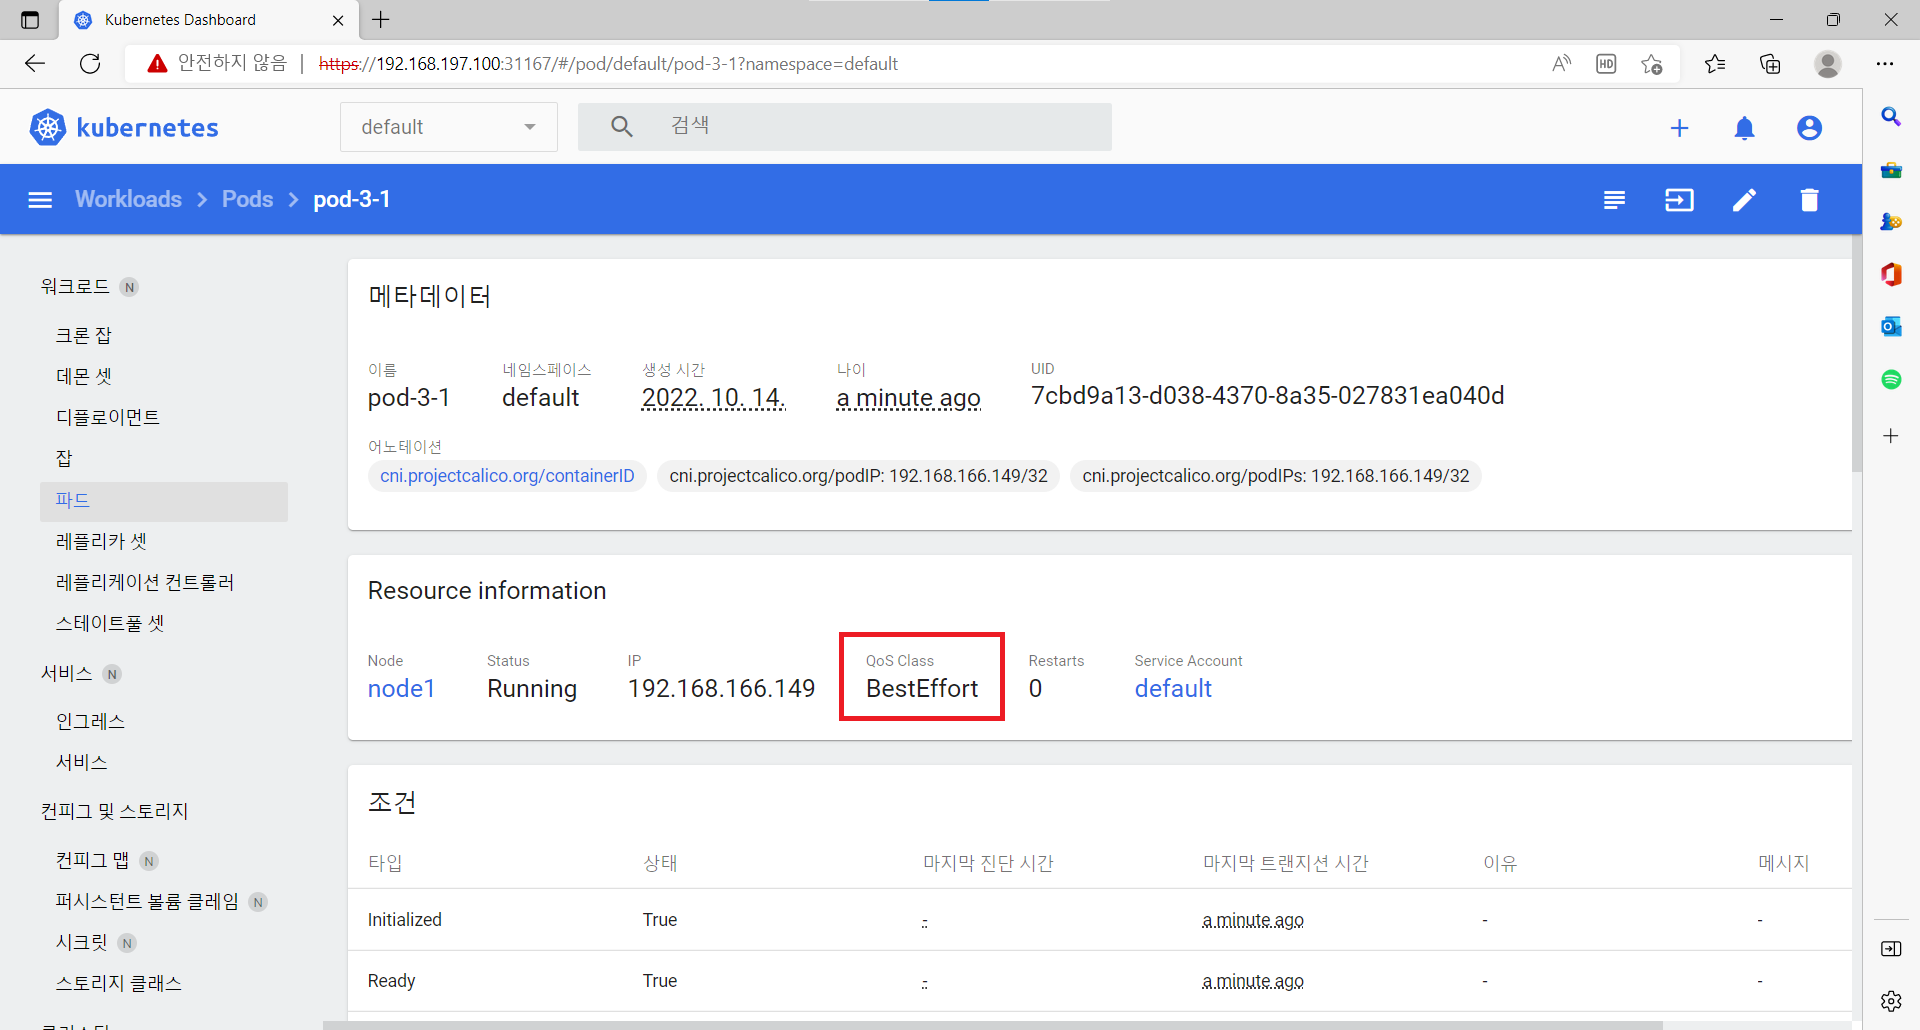
파드의 사양을 설정 할 수 있다.
- 콘솔에서 확인 방법
kubectl describe Pod pod-3-1 | grep QoS # pod 이름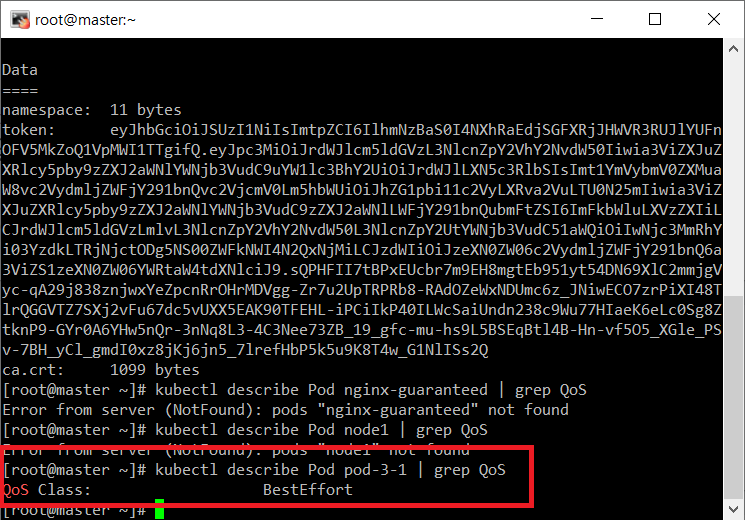
- BestEffort : resources 항목을 아예 사용하지 않을 경우 BestEffort로 분류
apiVersion: v1
kind: Pod
metadata:
  name: nginx-besteffort-pod
spec:
  containers:
  - name: nginx-besteffort-pod
 image: nginx:latest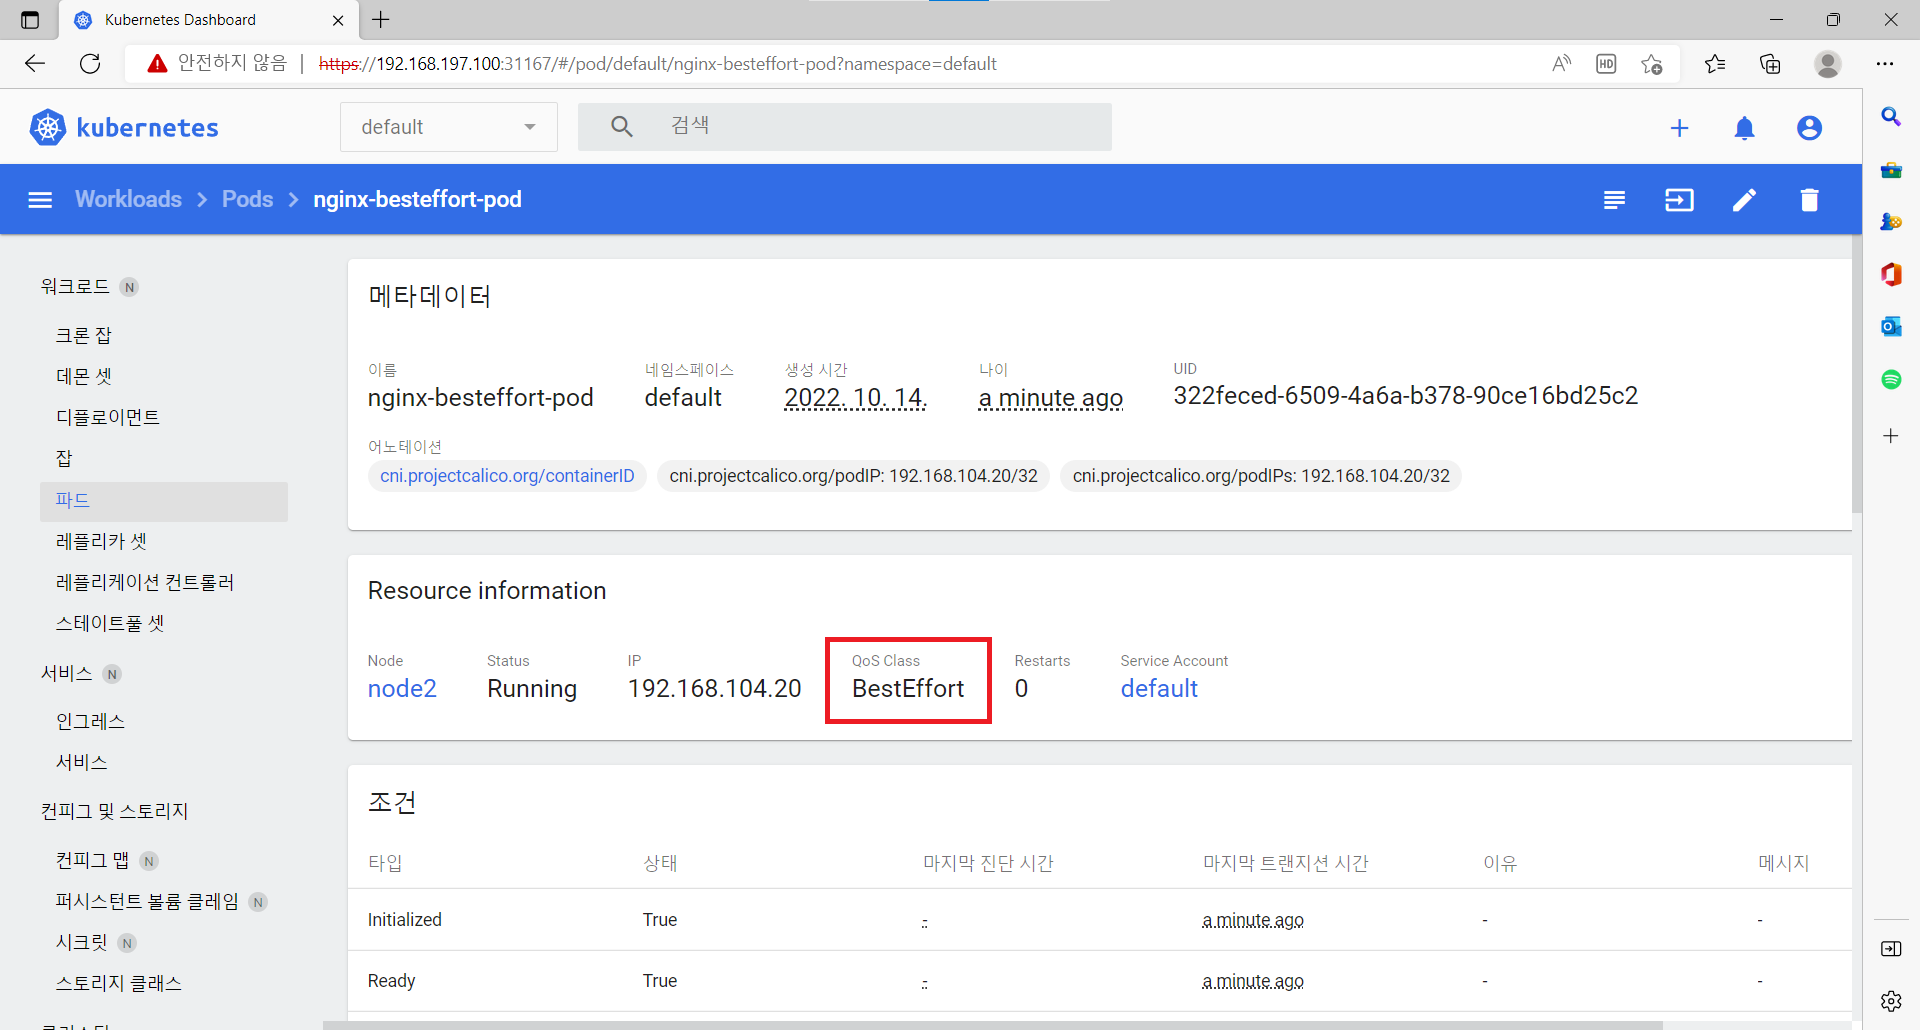
- 부하주기
apt update
apt install -y stress
stress --vm 4 --vm-bytes 1024M  # 과부화가 되면 꺼진다.
- 부하주기
- Guaranteed : resources 항목에서 limits와 request의 값이 완전히 동일한 경우 Guaranteed로 분류
apiVersion: v1
kind: Pod
metadata:
  name: nginx-guaranteed-pod
spec:
  containers:
  - name: nginx-guaranteed-pod
 image: nginx:latest
 resources:
   limits:
     memory: "256Mi"
     cpu: "1000m"
   requests:
     memory: "256Mi"
     cpu: "1000m"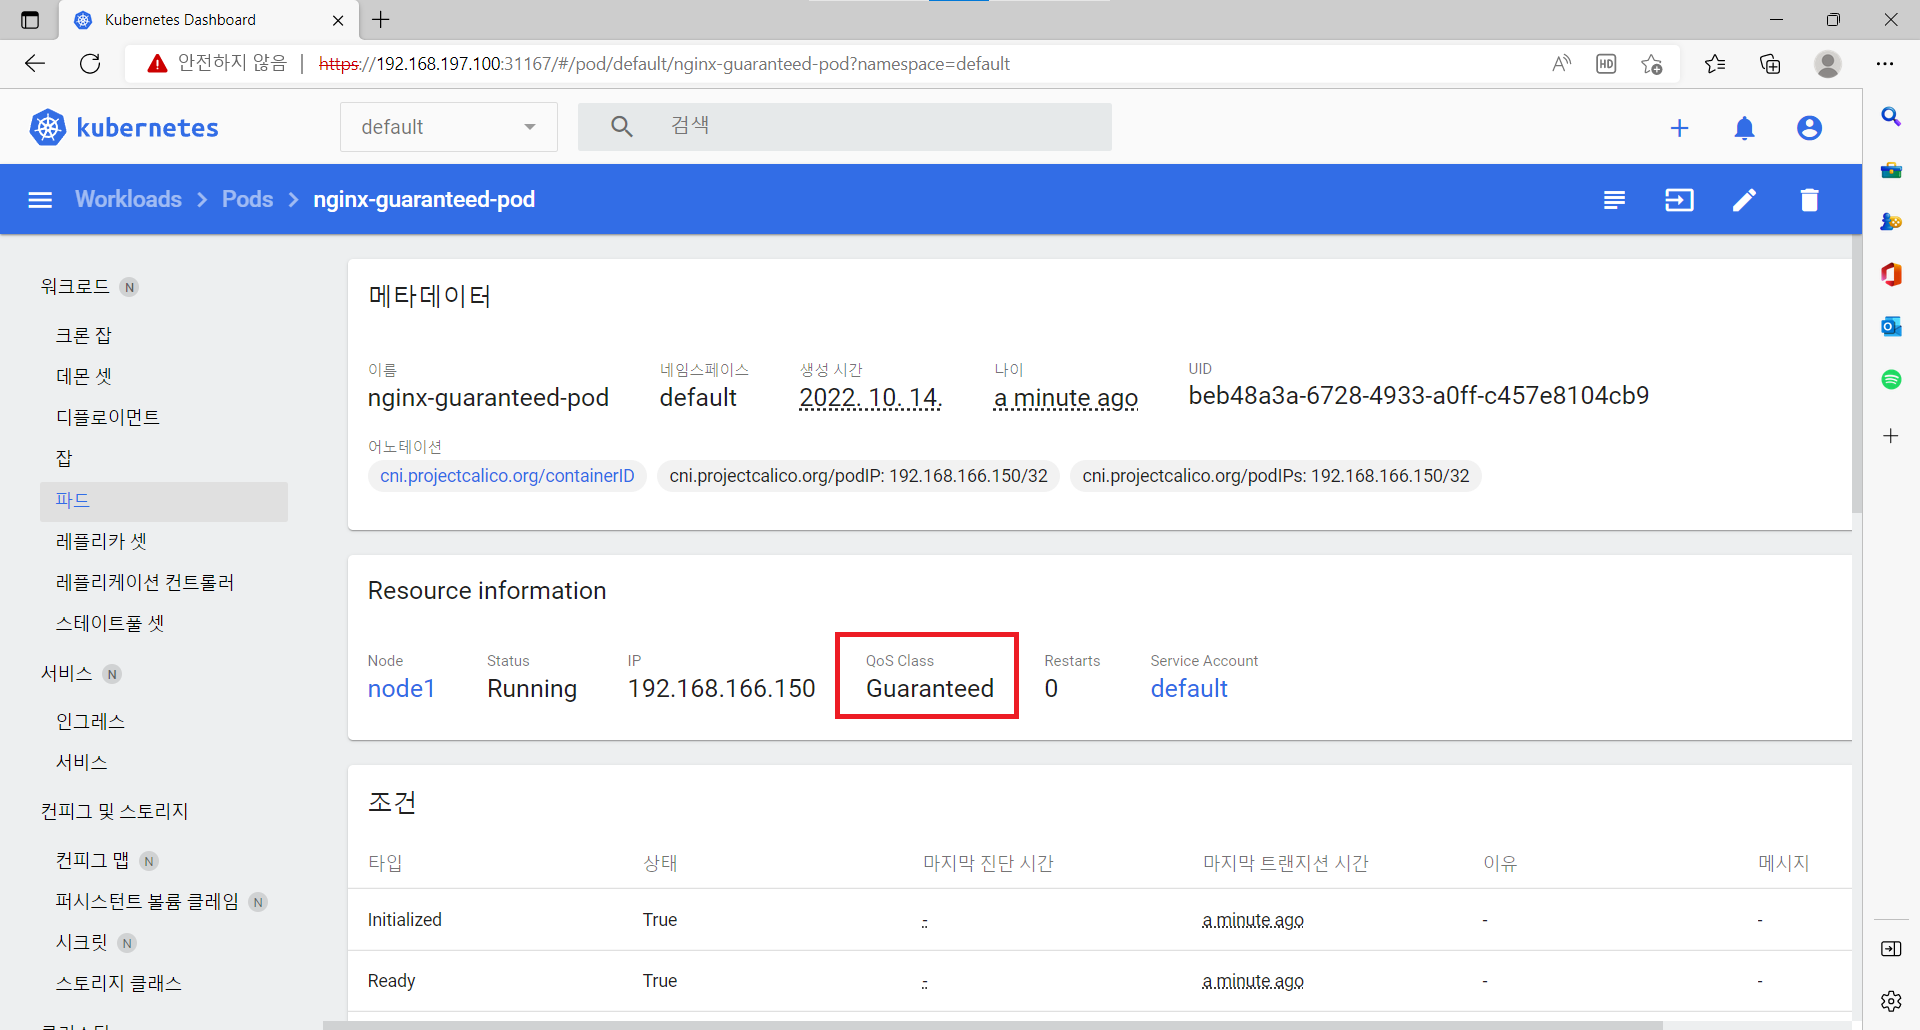
- 부하주기
apt update
apt install -y stress
stress --vm 1 --vm-bytes 256M   #256M 이상을 주면 꺼진다.
- 부하주기
- Burstable : resources 항목에서 limits가 requests보다 클 경우 Burstable로 분류
apiVersion: v1
kind: Pod
metadata:
  name: nginx-burstable-pod
spec:
  containers:
  - name: nginx-burstable-pod
 image: nginx:latest
 resources:
   limits:
     memory: "1024Mi"
     cpu: "1000m"
   requests:
     memory: "256Mi"
     cpu: "500m"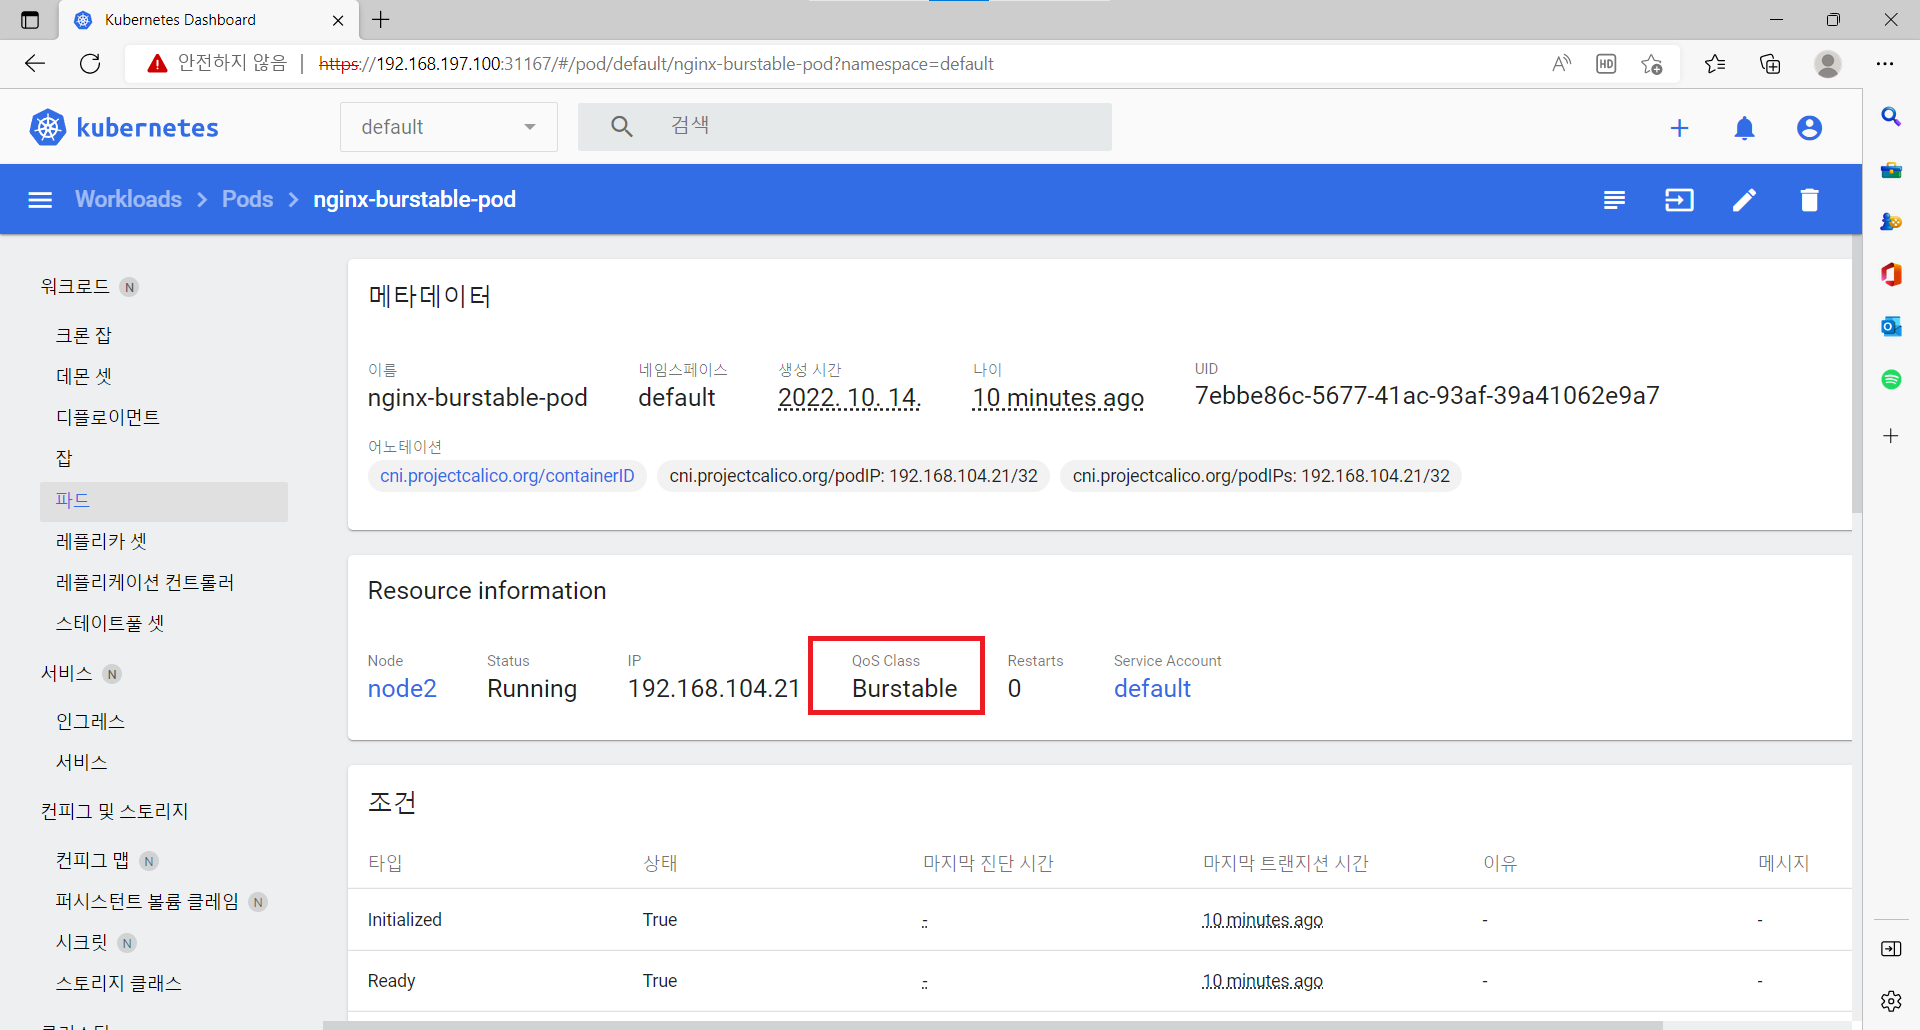
- 부하주기
apt update
apt install -y stress
stress --vm 2 --vm-bytes 512M  #1024M 이상을 주면 꺼진다.
- 부하주기
- 우선 순위
 Guaranteed > Burstable > BestEffort
 단, Burstable과 BestEffort 간에는 메모리의 사용량에 따라 우선순위가 바뀔 수 있다.
Vloume
컨테이너가 사용할 가상의 디스크
- emptyDir
파드내에 있는 컨테이너가 꺼져도 폴더가 남아있음
```yaml apiVersion: v1 kind: Pod metadata: name: pod-volume-1 spec: containers:- name: container1 image: xc7230/hello:0.2 volumeMounts:
- name: empty-dir mountPath: /mount1 - name: container2 image: xc7230/hello:0.2 volumeMounts:
- name: empty-dir
mountPath: /mount2
volumes:
- name : empty-dir
emptyDir: {}
```


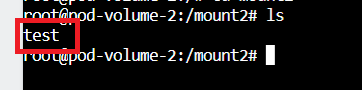
Container1
cd mount1
touch test
Container2
cd mount2
ls  # 컨테이너1에서 생성한 test파일이 있는지 확인
- hostPath
apiVersion: v1
kind: Pod
metadata:
  name: pod-volume-3
spec:
  nodeSelector:
    kubernetes.io/hostname: node1
  containers:
  - name: container
    image: xc7230/hello:0.2
    volumeMounts:
    - name: host-path
      mountPath: /mount1
  volumes:
  - name : host-path
    hostPath:
      path: /node-vol
      type: DirectoryOrCreate
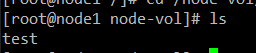
Container1
cd mount1
touch test
node1
cd mount1
ls
- PVC / PV
PVC를 지정하여 관리자가 생성한 PV와 연결해서 사용
- pv
```yaml
apiVersion: v1
kind: PersistentVolume
metadata:
name: pv-03
spec:
capacity:
storage: 2G
accessModes: # 권한
- ReadWriteOnce
local:
path: /node-vol # 노드에 디렉토리가 있어야 함
nodeAffinity: # 노드 제한
required:
nodeSelectorTerms:
- matchExpressions:
- {key: kubernetes.io/hostname, operator: In, values: [노드이름]} ```
- matchExpressions:
- ReadWriteOnce
local:
path: /node-vol # 노드에 디렉토리가 있어야 함
nodeAffinity: # 노드 제한
required:
nodeSelectorTerms:
- pvc
```yaml
apiVersion: v1
kind: PersistentVolumeClaim
metadata:
name: pvc-01
spec:
accessModes:
- ReadWriteOnce resources: requests: storage: 1G storageClassName: “” ```
- 파드 생성
```yaml
apiVersion: v1
kind: Pod
metadata:
name: pod-volume-3
spec:
containers:
- name: container
image: 이미지이름
volumeMounts:
- name: pvc-pv mountPath: /mount3 volumes:
- name : pvc-pv persistentVolumeClaim: claimName: pvc-01
- name : host-path
hostPath:
path: /node-v2
type: DirectoryOrCreate
```


pvc-pv는 1:1 관계다.
- name: container
image: 이미지이름
volumeMounts:
- 사이드카 패턴
master - 이미지 업로드용 디렉토리 생성
mkdir puller cd puller -
contents-pull.sh 추가
- Dockerfile 생성
vi DockerfileFROM python:3.9.15-buster ADD ./contents-pull.sh /contents-pull.sh RUN chmod 755 /contents-pull.sh WORKDIR / CMD /contents-pull.sh - 이미지 파일 생성 후 도커 허브에 업로드
docker build --tag xc7230/puller:0.2 . docker push xc7230/puller:0.2 - 쿠버네티스 대시보드에 파드 생성하기
```yaml
apiVersion: v1
kind: Pod
metadata:
name: sidecar
spec:
containers:
- name: httpd
image: httpd
volumeMounts:
- mountPath: /usr/local/apache2/htdocs/ name: contents-vol readOnly: true
- name: puller
image: xc7230/puller:0.2
env:
- name: CONTENTS_SOURCE_URL value: “http://192.168.197.1:1234”
- name: FILE_NAME value: “index.html” volumeMounts:
- mountPath: /data name: contents-vol volumes:
- name: contents-vol emptyDir: {} ```
- name: httpd
image: httpd
volumeMounts:
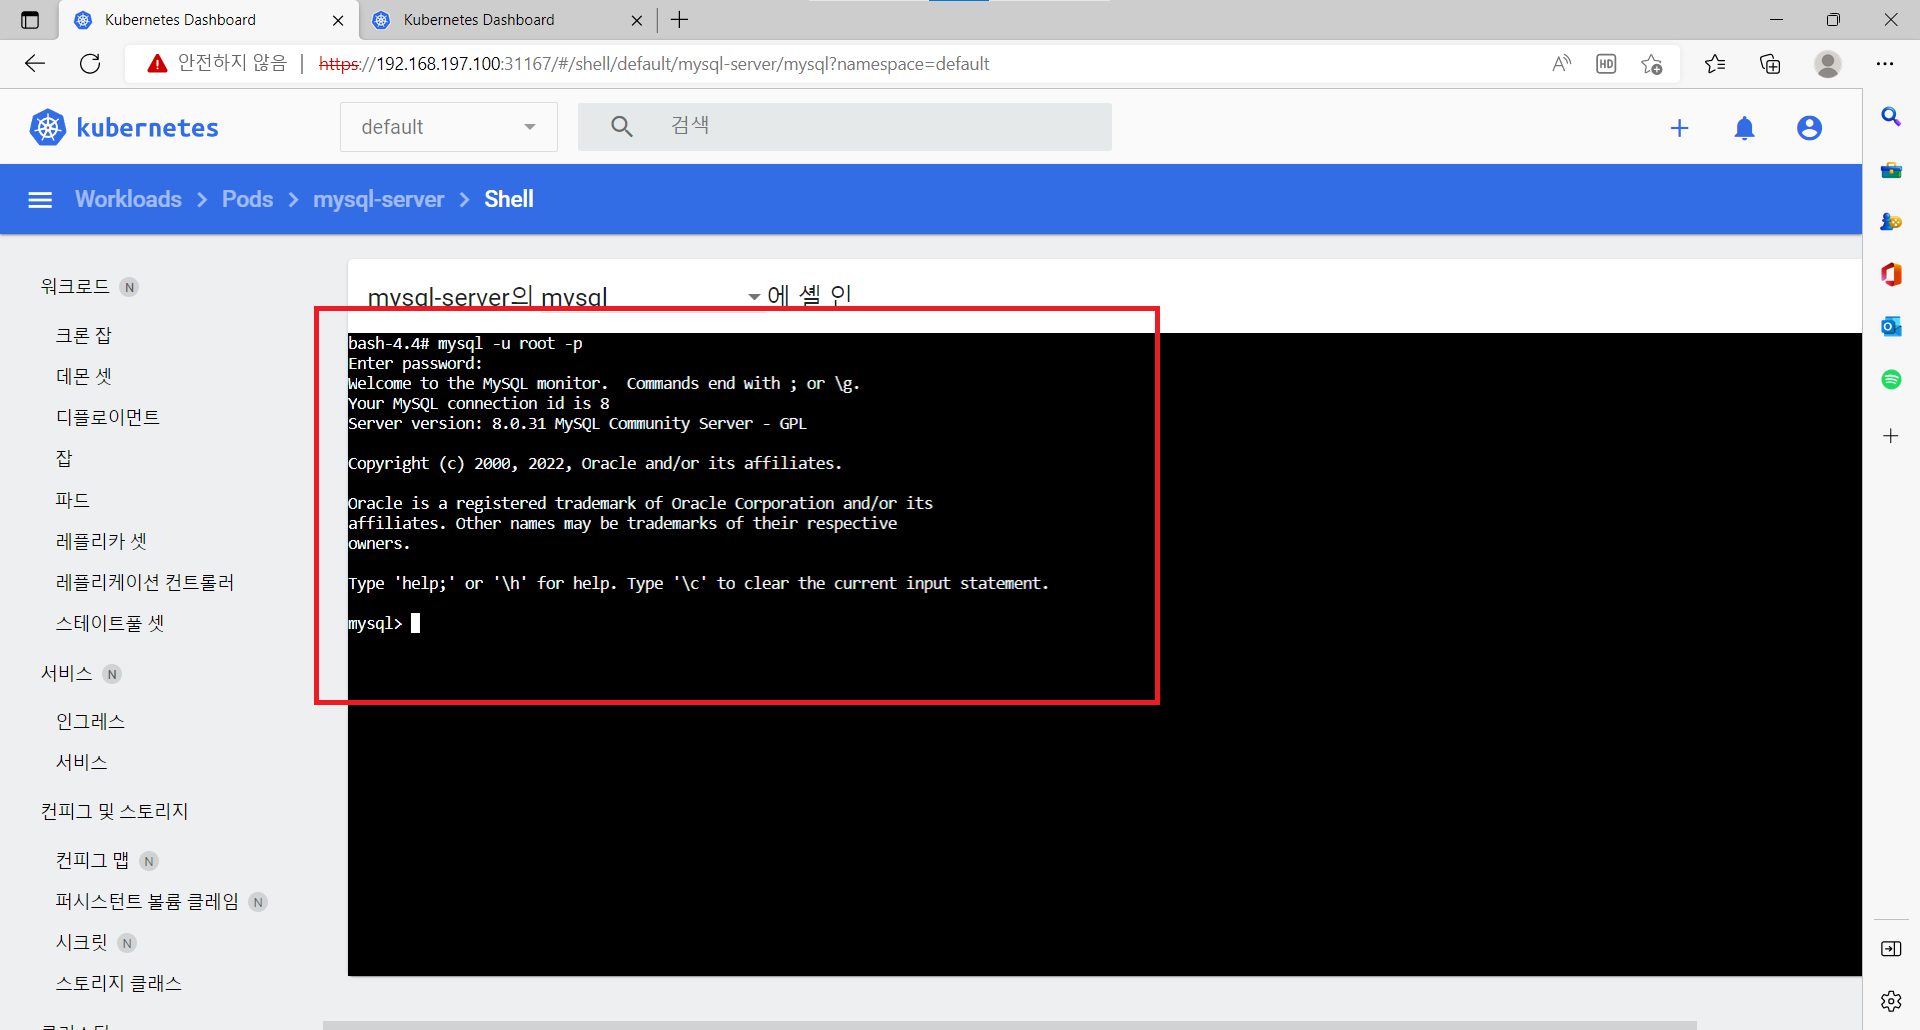
- DB파드
파드가 삭제돼도 안에 있는 데이터를 삭제하기 않게 만든다.
```yaml apiVersion: v1 kind: Pod metadata: name: mysql-server spec: nodeSelector: kubernetes.io/hostname: node1 containers:- name: mysql
image: mysql
env:
- name: MYSQL_ROOT_PASSWORD value: “qwer1234” volumeMounts:
- mountPath: /var/lib/mysql name: db-vol volumes:
- name : db-vol hostPath: path: /db-vol type: DirectoryOrCreate ```
- name: mysql
image: mysql
env:
ConfigMap
- 컨피그맵 생성
apiVersion: v1 kind: ConfigMap metadata: name: cm-dev data: SSH: 'false' User: dev - 컨피그맵 적용
```yaml
apiVersion: v1
kind: Pod
metadata:
name: pod-1
spec:
containers:
- name: container
image: ubuntu:latest
command: [“/bin/sh”, “-ec”, “while :; do echo ‘.’; sleep 5 ; done”]
envFrom:
- configMapRef: name: cm-dev ```
- name: container
image: ubuntu:latest
command: [“/bin/sh”, “-ec”, “while :; do echo ‘.’; sleep 5 ; done”]
envFrom:
- 확인
  echo $SSH
  echo $User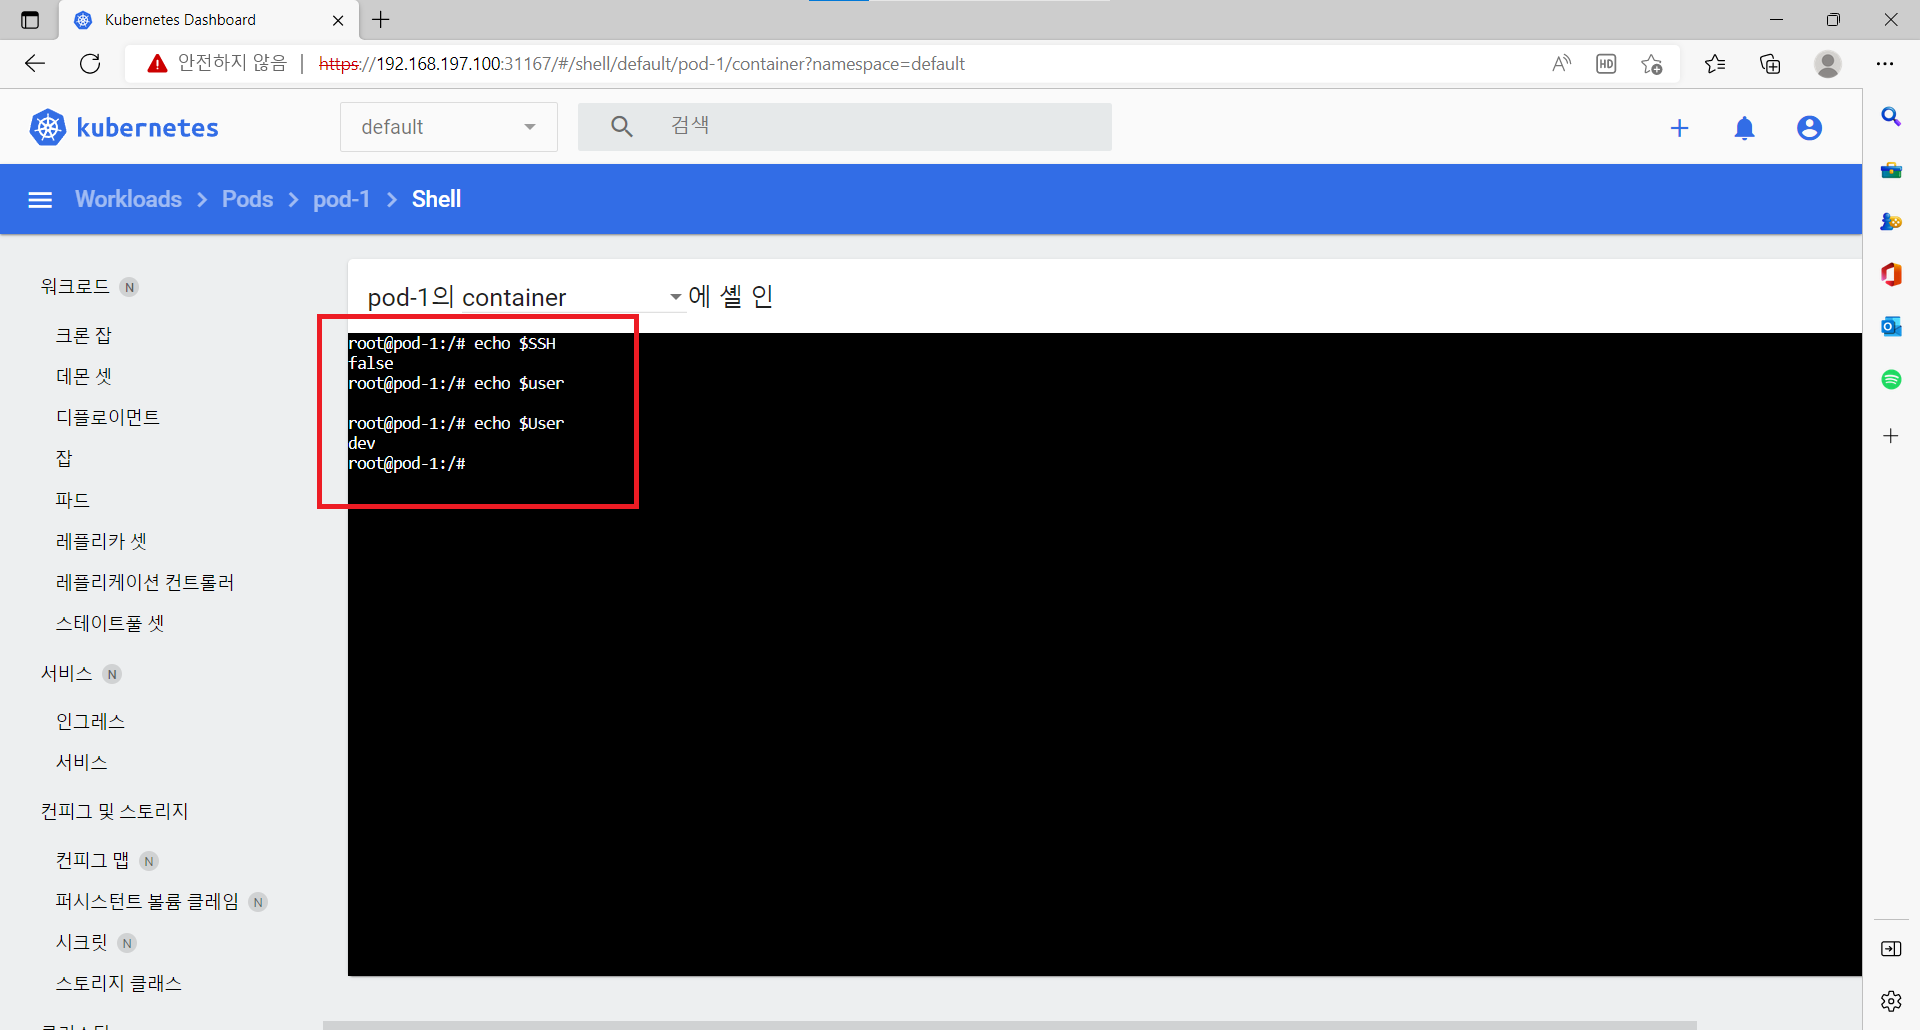
- 실습
- 컨피그맵 생성
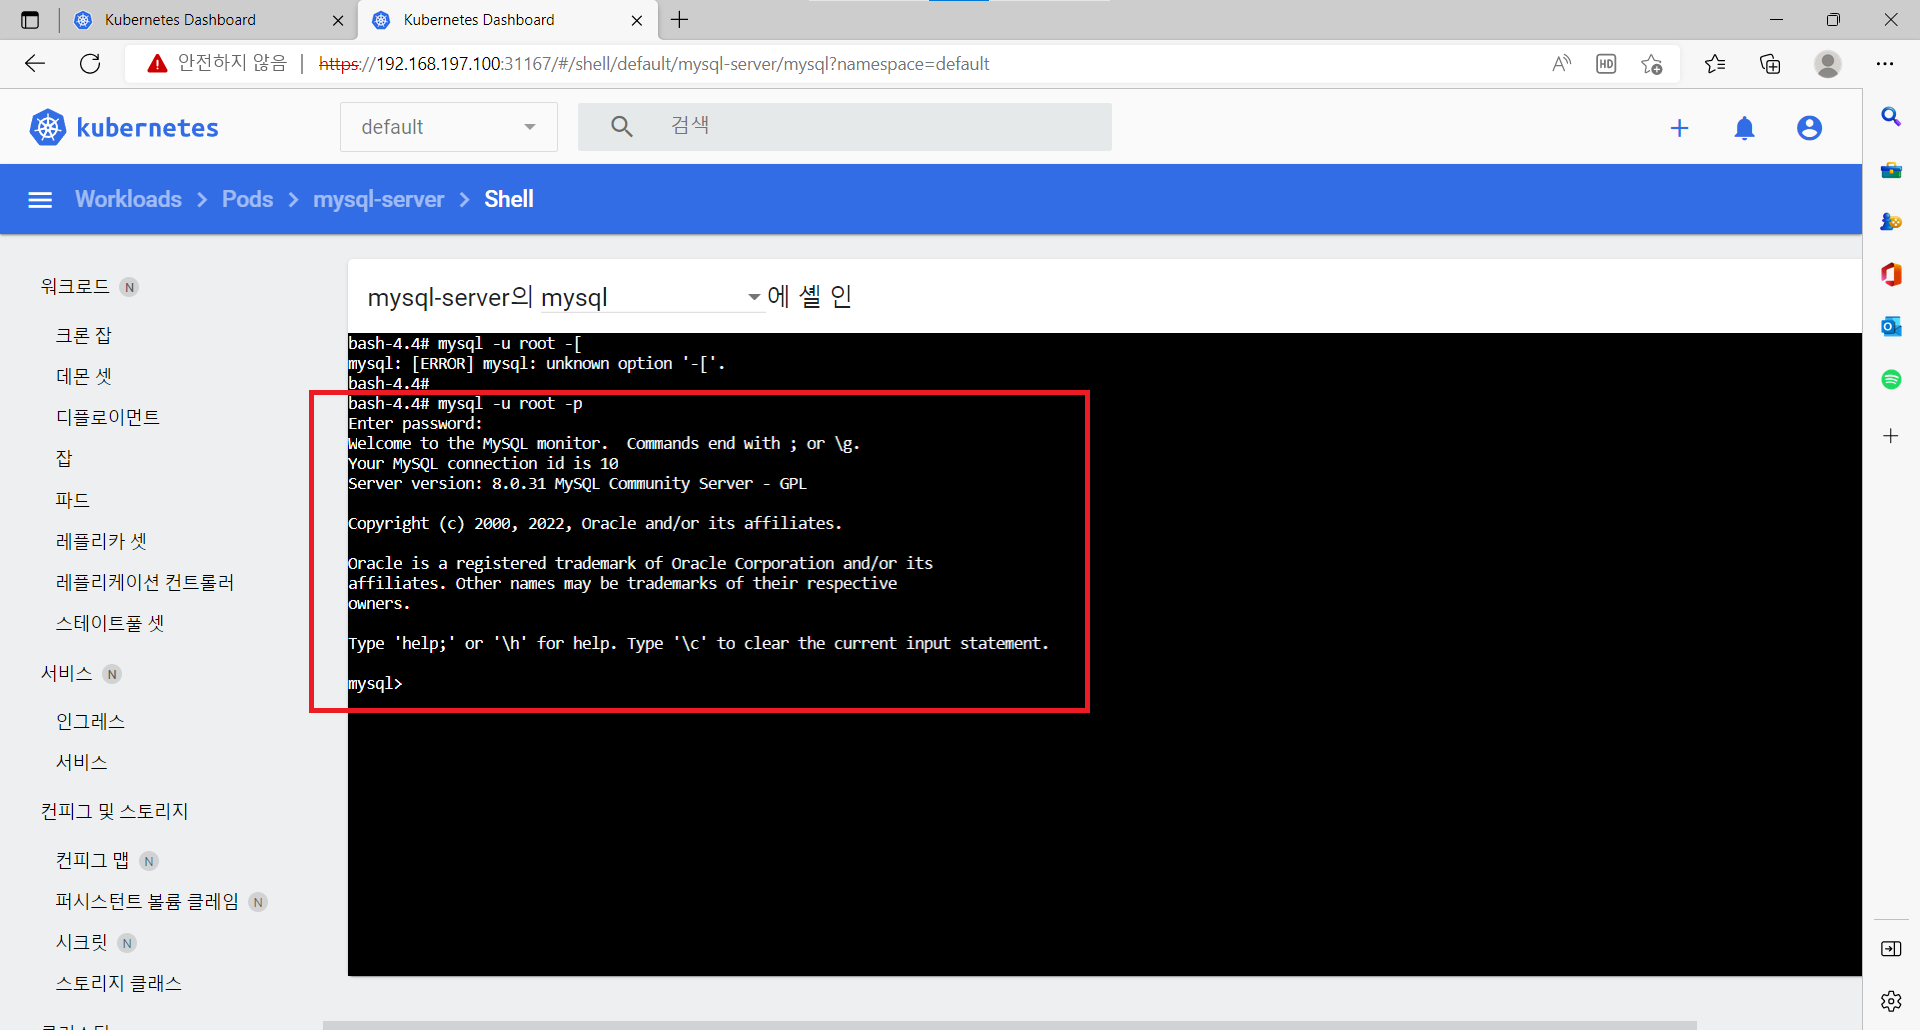
apiVersion: v1 kind: ConfigMap metadata: name: sql-pw data: MYSQL_ROOT_PASSWORD : "qwer1234" - 파드 생성
``` yaml
apiVersion: v1
kind: Pod
metadata:
name: mysql-server
spec:
nodeSelector:
kubernetes.io/hostname: node1
containers:
- name: mysql
image: mysql
envFrom:
- configMapRef: # 이곳 변경 name: sql-pw volumeMounts:
- mountPath: /var/lib/mysql name: db-vol volumes:
- name : db-vol
hostPath:
path: /db-vol
type: DirectoryOrCreate
```
- name: mysql
image: mysql
envFrom:
Secret : 컨피그 맵과 유사 하지만 기밀을 데이터를 보관하기 위한 것
- 컨피그맵 작성
apiVersion: v1 kind: Secret metadata: name: sec-dev data: Key: cXdlcjEyMzQ= #base24에서 비밀번호를 암호화 해준다. - 파드 생성
```yaml
apiVersion: v1
kind: Pod
metadata:
name: mysql-server
spec:
nodeSelector:
kubernetes.io/hostname: node1
containers:
- name: mysql
image: mysql
envFrom:
- secretRef: # 이곳 변경 name: sec-dev volumeMounts:
- mountPath: /var/lib/mysql name: db-vol volumes:
- name : db-vol
hostPath:
path: /db-vol
type: DirectoryOrCreate
```
- name: mysql
image: mysql
envFrom:
Namespace
네임스페이스별로 파드 동작 확인하기
kubectl get pods -n kubernetes-dashboard
- 네임스페이스 생성
apiVersion: v1
  kind: Namespace
  metadata:
name: nm-1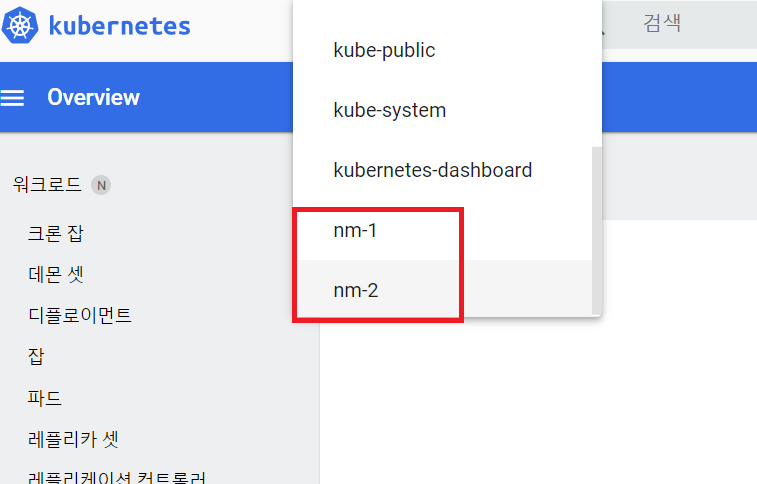
- 파드 생성
```yaml
apiVersion: v1
kind: Pod
metadata:
name: pod-1
namespace: nm-1 # 네임스페이스 이름
labels:
app: pod
spec:
containers:
- name: container image: ubuntu:latest command: [“/bin/sh”, “-ec”, “while :; do echo ‘.’; sleep 5 ; done”] ```
-
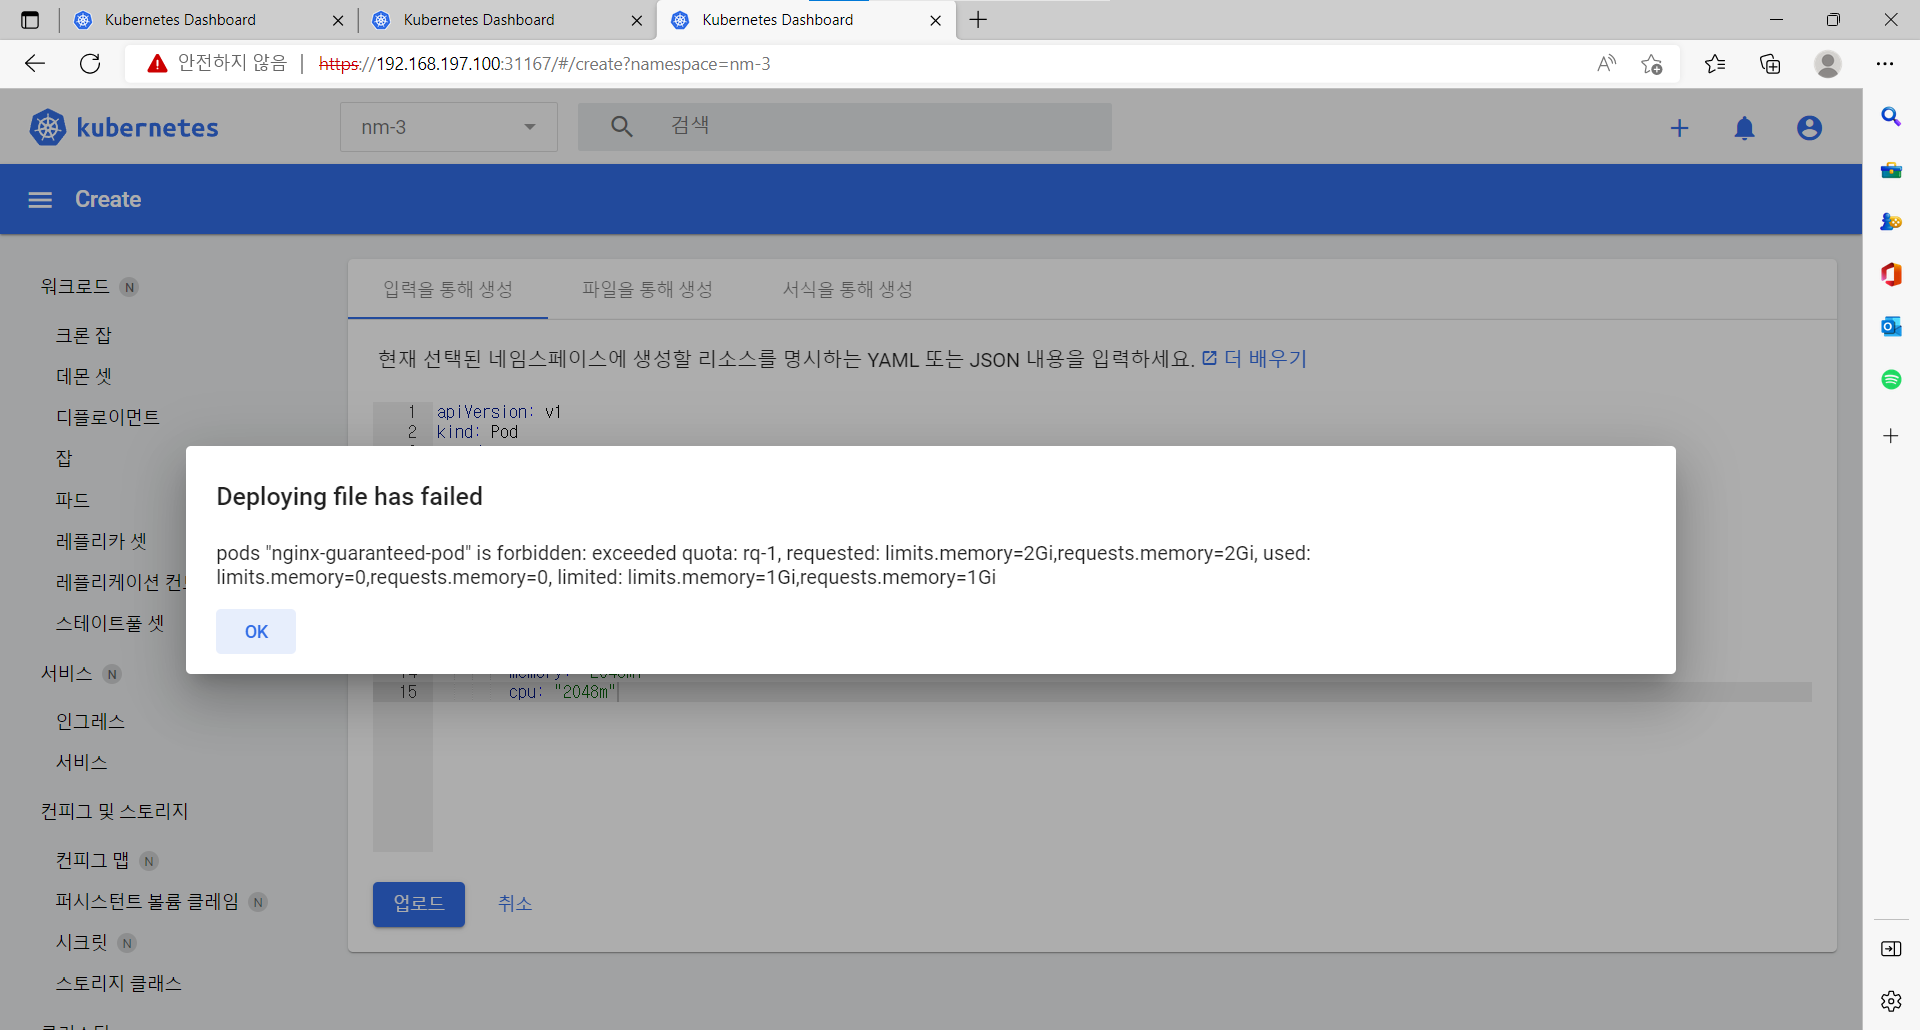
리소스쿼터
- 네임스페이스 생성
apiVersion: v1 kind: Namespace metadata: name: nm-3apiVersion: v1 kind: ResourceQuota metadata: name: rq-1 namespace: nm-3 spec: hard: requests.memory: 1Gi limits.memory: 1Gi
- 네임스페이스 생성
- 확인
- 파드 생성
```yaml
apiVersion: v1
kind: Pod
metadata:
name: nginx-guaranteed-pod
spec:
containers:
- name: nginx-guaranteed-pod2
image: nginx:latest
resources:
limits:
memory: “256Mi”
cpu: “256m”
requests:
memory: “256Mi”
cpu: “256m”
```
파드가 성공적으로 만들어 진다.
- name: nginx-guaranteed-pod2
image: nginx:latest
resources:
limits:
memory: “256Mi”
cpu: “256m”
requests:
memory: “256Mi”
cpu: “256m”
```
파드가 성공적으로 만들어 진다.
- 파드생성(과용량)
```yaml
apiVersion: v1
kind: Pod
metadata:
name: nginx-guaranteed-pod
spec:
containers:
- name: nginx-guaranteed-pod2
image: nginx:latest
resources:
limits:
memory: “1024Mi”
cpu: “1024m”
requests:
memory: “1024Mi”
cpu: “1024m”
```
리소스 초과로 파드가 생성되지 않는다.
- name: nginx-guaranteed-pod2
image: nginx:latest
resources:
limits:
memory: “1024Mi”
cpu: “1024m”
requests:
memory: “1024Mi”
cpu: “1024m”
```
리소스 초과로 파드가 생성되지 않는다.
- 파드 생성
```yaml
apiVersion: v1
kind: Pod
metadata:
name: nginx-guaranteed-pod
spec:
containers:
LimitRange
- 네임스페이스 생성
apiVersion: v1 kind: Namespace metadata: name: nm-4 - 리밋레인지 설정
```yaml
apiVersion: v1
kind: LimitRange
metadata:
name: lr-1
namespace: nm-4
spec:
limits:
- type: Container min: # 최소 메모리 memory: 0.1Gi max: # 최대 메모리 memory: 0.4Gi maxLimitRequestRatio: memory: 3 defaultRequest: # 기본 메모리값 memory: 0.1Gi default: memory: 0.2Gi ```
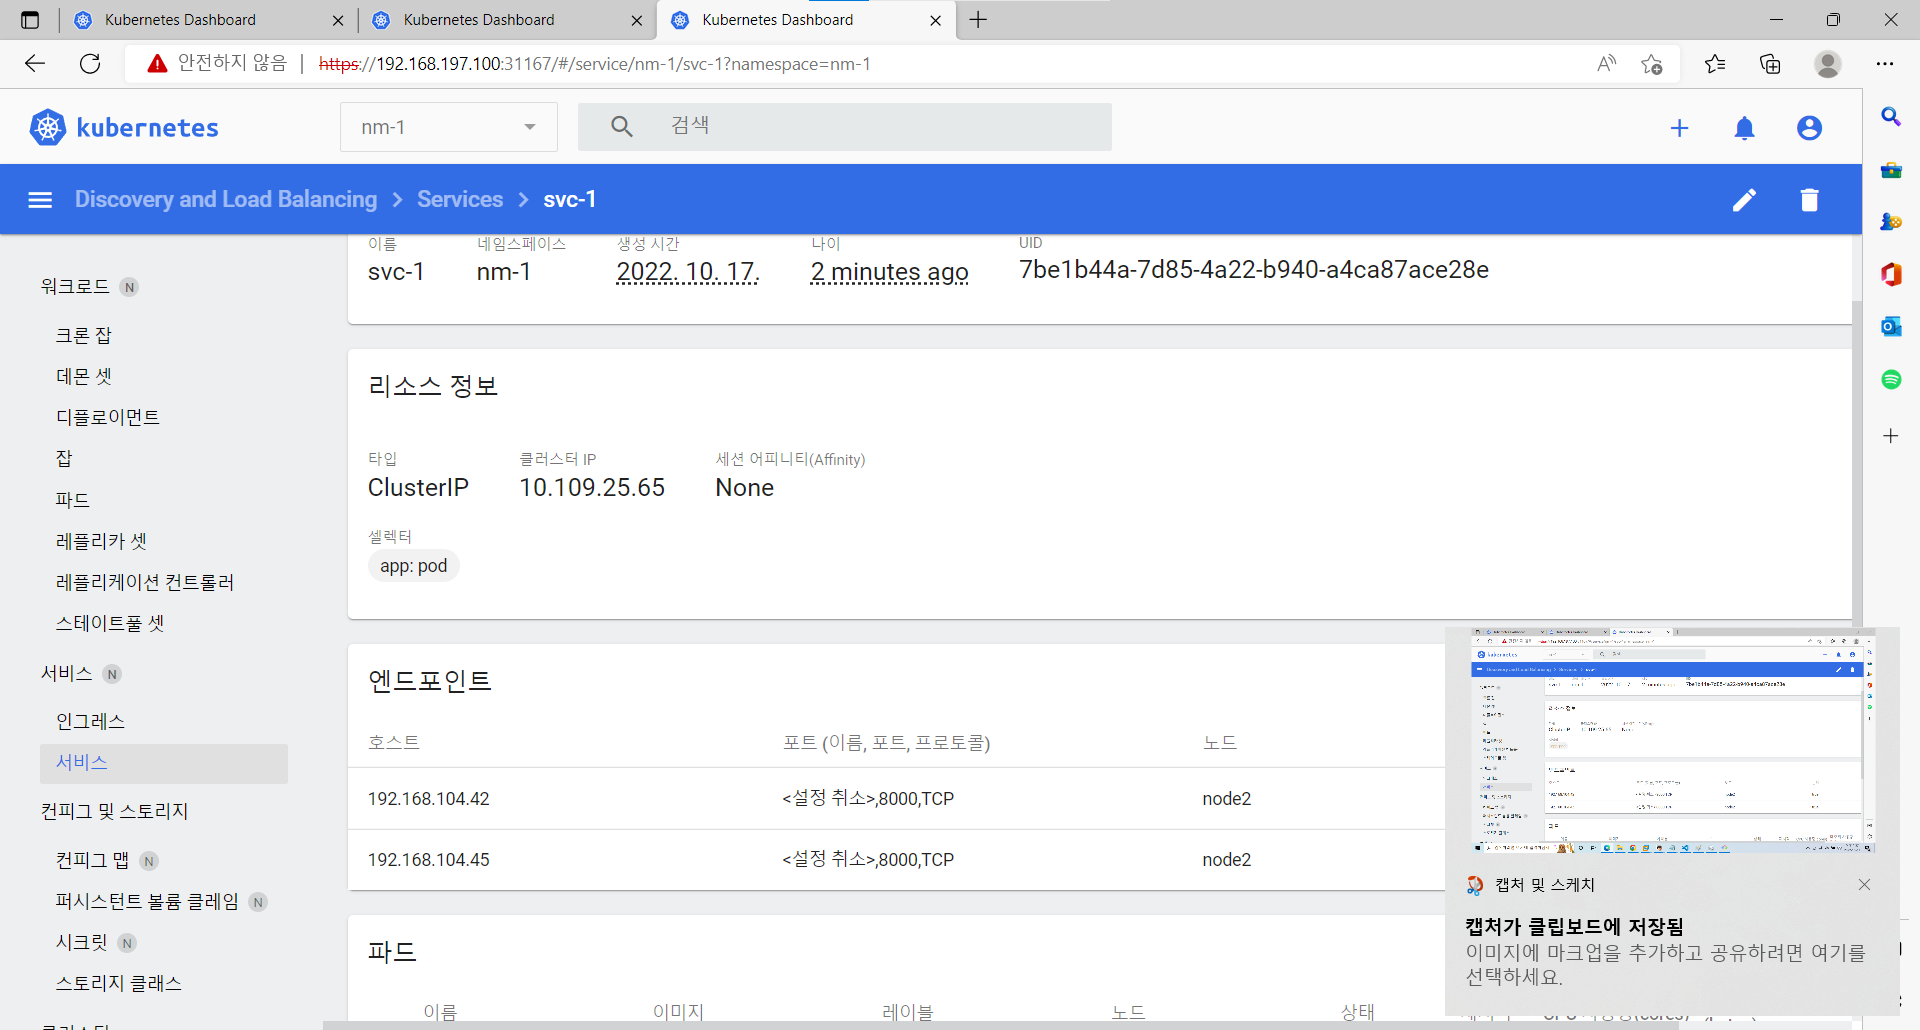
Service
- Cluster IP : 타입을 지정하지 않으면 기본적으로 생긴다.
- 파드 생성
```yaml
apiVersion: v1
kind: Pod
metadata:
name: pod-2
labels:
app: pod
spec:
containers:
- name: container image: xc7230/hello:0.1
```
- 서비스 생성
```yaml
apiVersion: v1
kind: Service
metadata:
name: svc-1
spec:
selector:
app: pod # 레이블 이름으로 선택함
ports:
- port: 9000
targetPort: 8000
```
- port: 9000
targetPort: 8000
```
- 확인
mastercurl 10.109.25.65:9000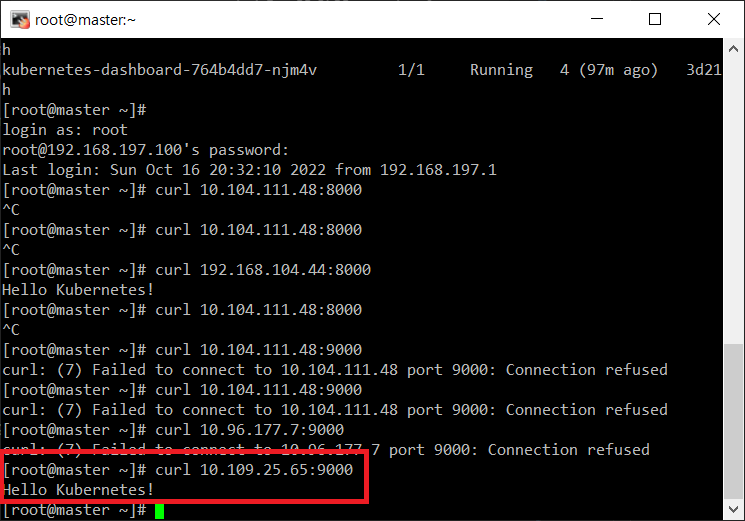
pod-2curl svc-1:9000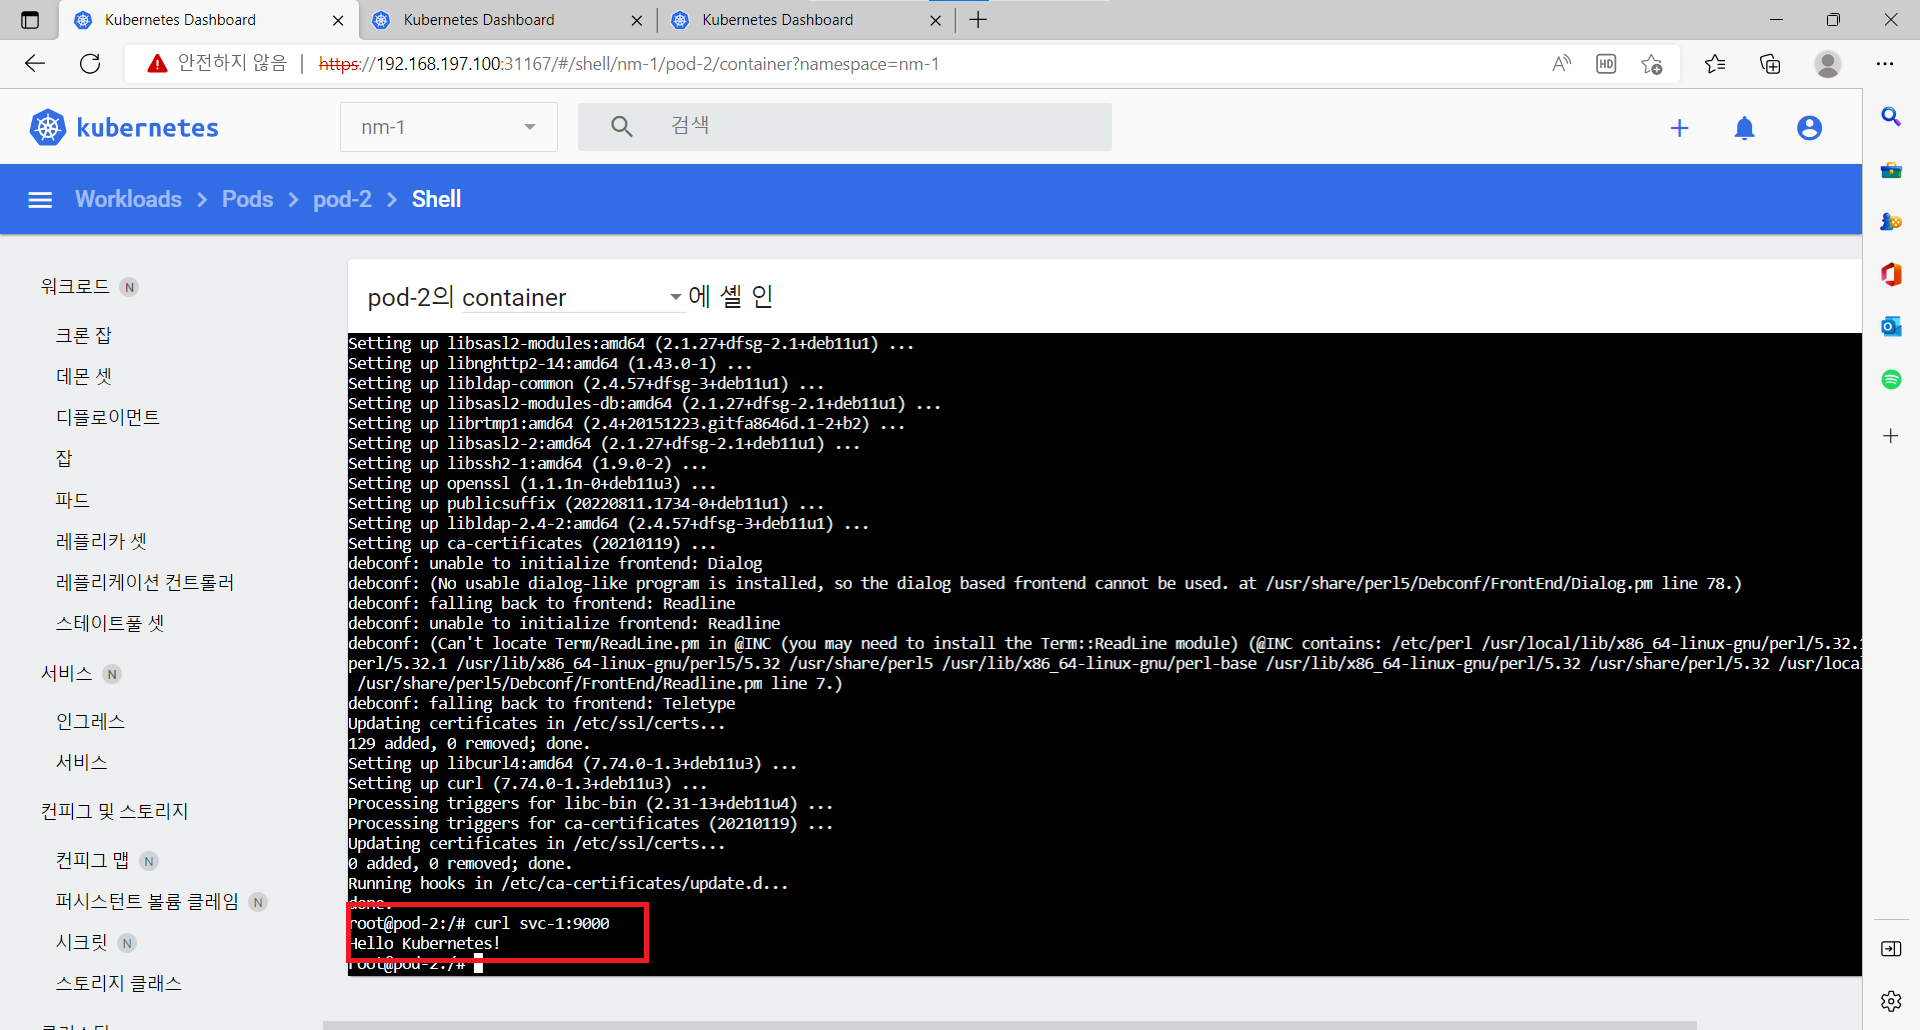
내부에서는 서비스 이름으로 호출이 가능하다.
- 파드 생성
```yaml
apiVersion: v1
kind: Pod
metadata:
name: pod-2
labels:
app: pod
spec:
containers:
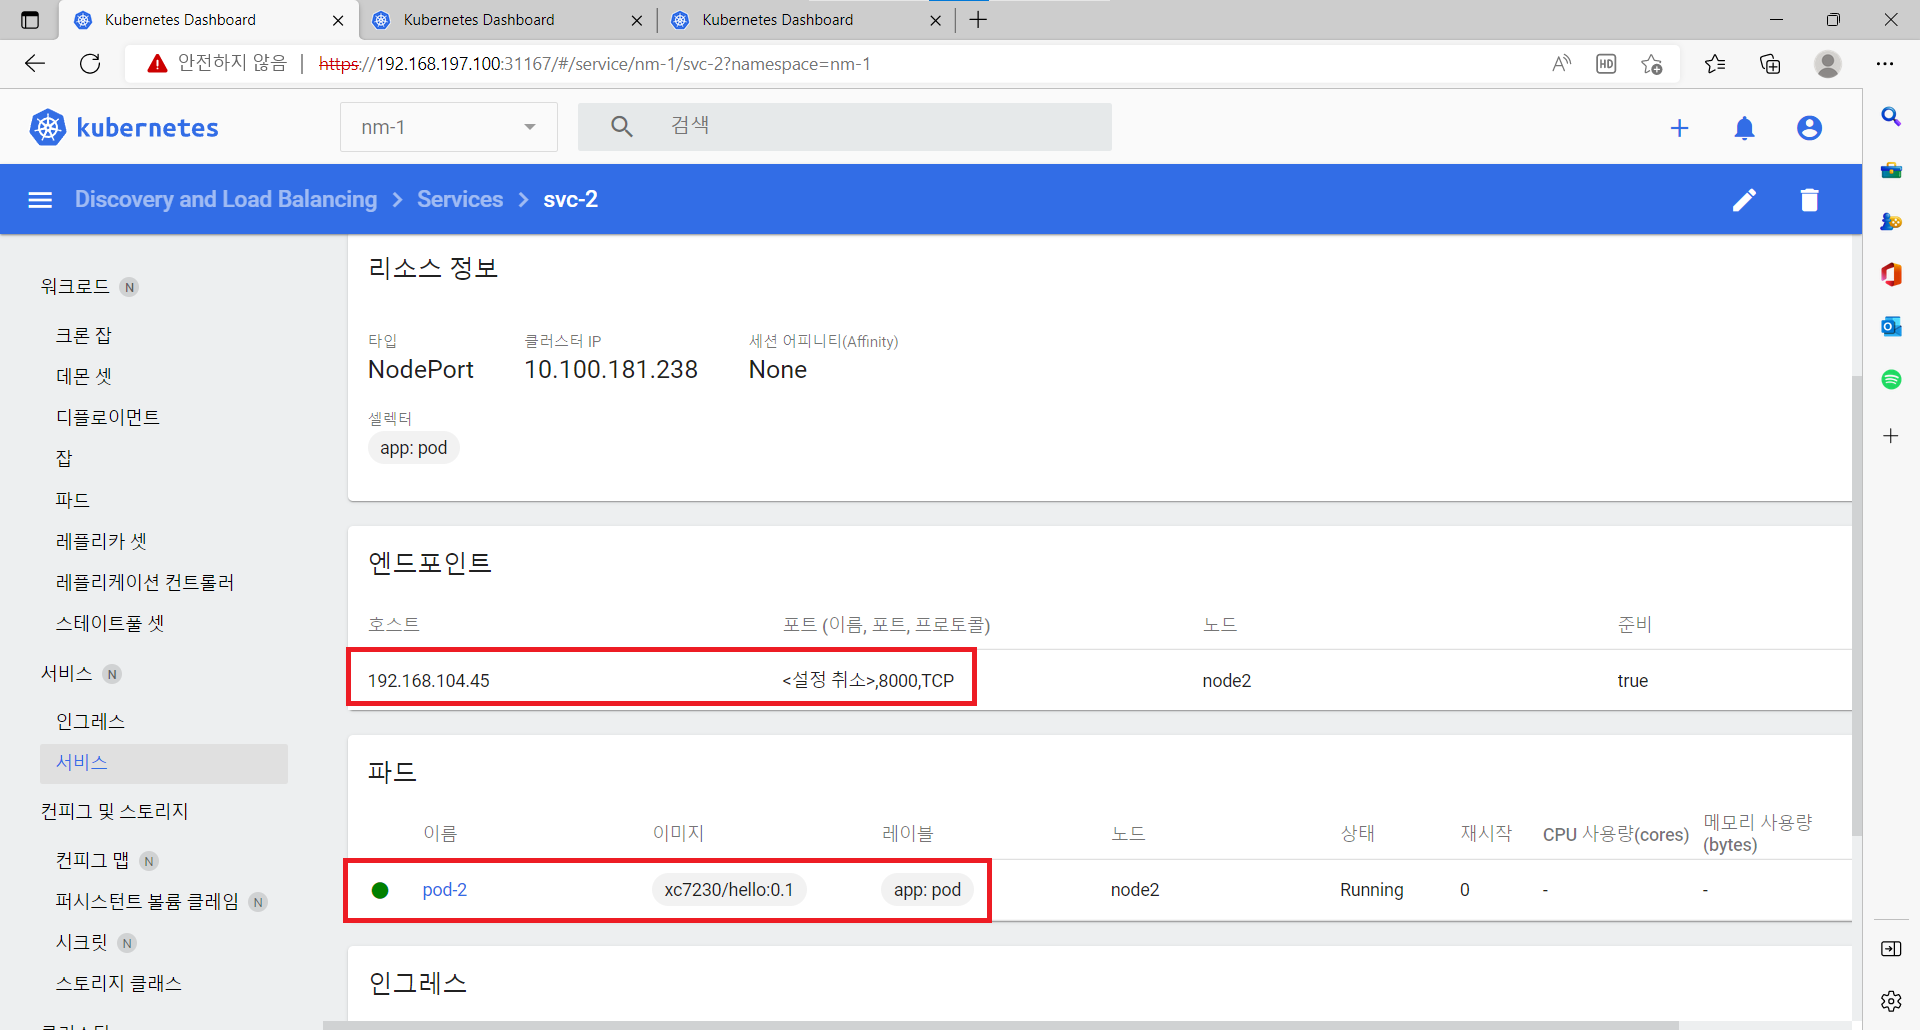
- NodePort
- 서비스 생성하기
```yaml
apiVersion: v1
kind: Service
metadata:
name: svc-2
spec:
selector:
app: pod
ports:
- port: 9000
targetPort: 8000
nodePort: 30000
type: NodePort
```
- port: 9000
targetPort: 8000
nodePort: 30000
type: NodePort
```
- 확인
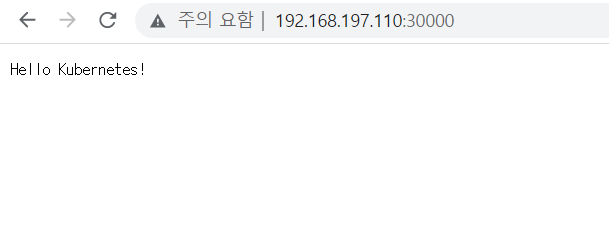
노드들(node1, node2)의 아이피에 설정한 포트번호(30000)를 추가해주면 pod-2의 정보가 나온다.
- 서비스 생성하기
```yaml
apiVersion: v1
kind: Service
metadata:
name: svc-2
spec:
selector:
app: pod
ports:
- LoadBalancer
- 설정하기
kubectl get configmap kube-proxy -n kube-system -o yaml | \
grep strictARP

# strictARP: false면 True로 바꿔줘야 한다.
kubectl get configmap kube-proxy -n kube-system -o yaml | \ sed -e "s/strictARP: false/strictARP: true/" | \ kubectl apply -f - -n kube-system#Warning: resource configmaps/kube-proxy is missing the kubectl.kubernetes.io/last-applied-configuration annotation which is required by kubectl apply. kubectl apply should only be used on resources created declaratively by either kubectl create --save-config or kubectl apply. The missing annotation will be patched automatically.configmap/kube-proxy configured 이 되면 성공 - MetalLB 설치
kubectl apply -f https://raw.githubusercontent.com/metallb/metallb/v0.11.0/manifests/namespace.yaml kubectl apply -f https://raw.githubusercontent.com/metallb/metallb/v0.11.0/manifests/metallb.yaml - 설치 확인
kubectl get pod -n metallb-system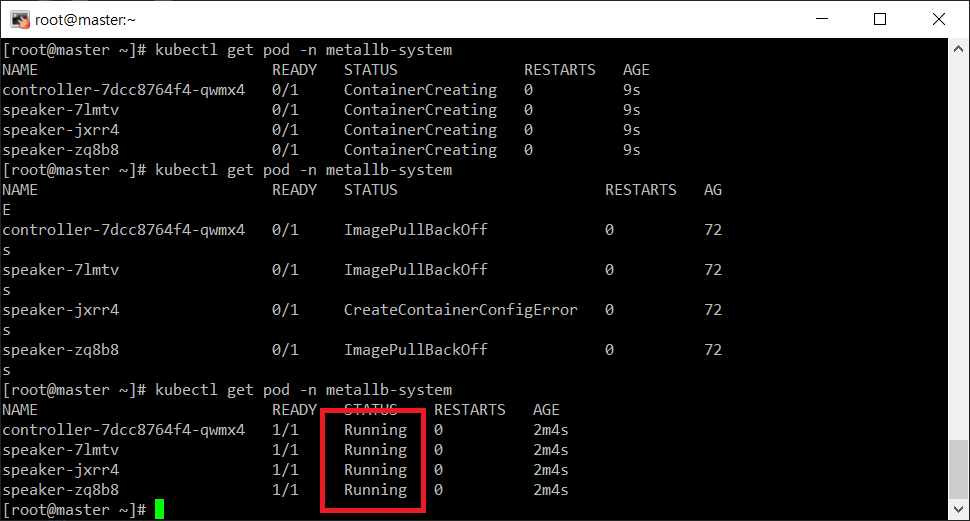
모두 Running이 뜨면 성공 - Layer 2 Configuration
vi metallb_config.yamlapiVersion: v1 kind: ConfigMap metadata: namespace: metallb-system name: config data: config: | address-pools: - name: default protocol: layer2 addresses: - 192.168.197.220-192.168.197.250kubectl apply -f metallb_config.yaml # configmap/config created가 나오면 성공 - MetalLB 사용
kubectl get svc/istio-ingressgateway -n istio-system - 서비스 만들기
```yaml
apiVersion: v1
kind: Service
metadata:
name: svc-3
spec:
selector:
app: pod
ports:
- port: 9000 targetPort: 8000 type: LoadBalancer ```
- 확인

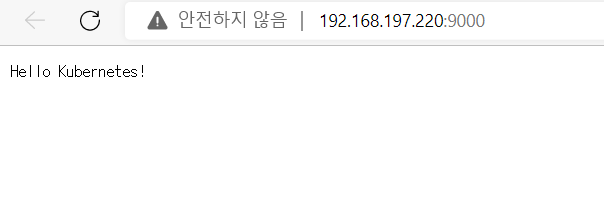
MetalLB로 할당된 아이피에 포트번호를 입력하면 다음과 같이 출력된다.
- 설정하기