[Linux] Ansible
Ansible
앤서블 설치
- 가상 OS 준비
control node    control   192.168.197.150
maanage node1   manage01  192.168.197.160
maanage node2   manage02  192.168.197.170
maanage node3   manage03  192.168.197.180
Manage Node 설정
ssh-keygen # 엔터 3번
Control Node
ssh-copy-id root@192.168.197.160    # 매니저 노드 IP

ssh root@192.168.197.160    # 매니저 노드 접속했을때, 비밀번호를 입력하지 않고 들어가지면 성공
dnf -y install centos-release-ansible-29
sed -i -e "s/enabled=1/enabled=0/g" /etc/yum.repos.d/CentOS-SIG-ansible-29.repo
dnf --enablerepo=centos-ansible-29 -y install ansible
- Manage 노드들과 연결
mkdir ansible/ cd ansible vi hosts.yamlall: hosts: 192.168.197.160: 192.168.197.170: 192.168.197.180: children: webservers: hosts: 192.168.197.160: 192.168.197.170: dbservers: hosts: 192.168.197.180: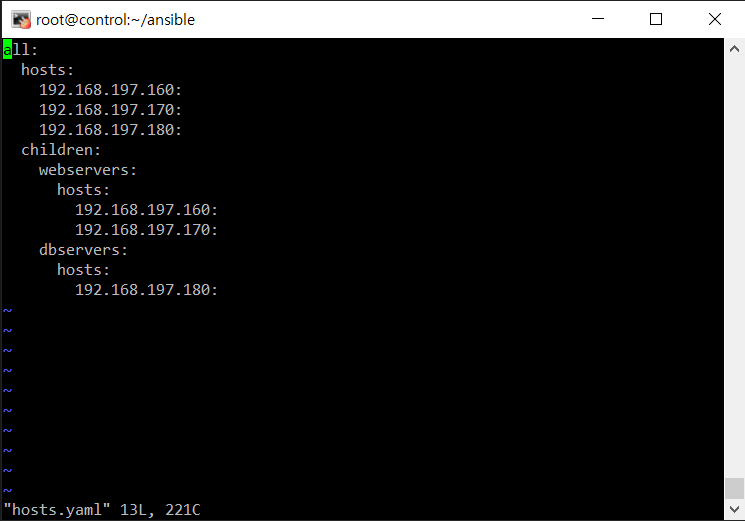
- 확인
ansible -i hosts.yaml -m ping dbservers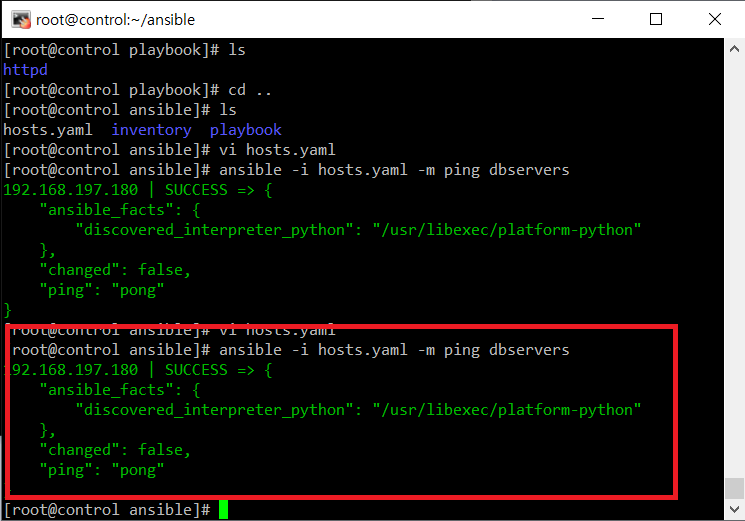
Playbook
Playbook으로 파일 옮기기
mkdir -p /root/ansible/playbook/httpd/template
cd /root/ansible/playbook/httpd/template
vi ansible.html
test01 <!--아무거나 입력-->
cd /root/ansible/playbook/httpd/
vi httpd-install.yaml
- hosts: ["192.168.197.160", "192.168.197.170"]
  tasks:
  - name: "Install httpd server"
    shell: |
      yum update -y
      yum install -y httpd
      systemctl stop firewalld
    become: yes

  - name: "copy file"
    copy:
      src: "template/ansible.html"
      dest: "/var/www/html/ansible.html"

  - name: "Install httpd server"
    shell: |
      systemctl restart httpd
    become: yes
ansible-playbook -i /root/ansible/hosts.yaml /root/ansible/playbook/httpd/httpd-install.yaml
# ansible-playbook  -i  인벤토리파일경로  플레이북파일경로
- 확인(node01, node02)
cd /var/www/html
ls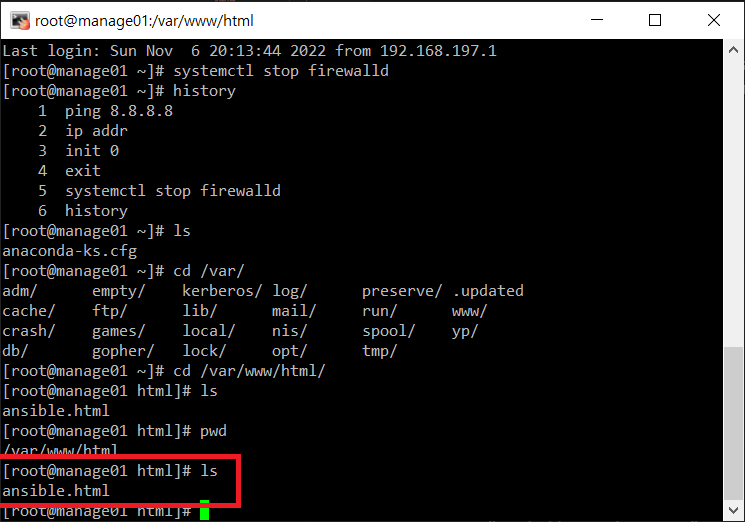
Playbook으로 mysql 생성
mysql설치
mkdir -p /ansible/playbook/mysql
cd /ansible/playbook/mysql
vi mysql-install.yaml
mysql-install.yaml
- hosts: ["192.168.197.180"]
  tasks:
  - name: "Install mysql Server"
    shell: |
      yum update -y
      yum install -y mysql-server
    become: yes

  - namm: "Start mysql Server"
    shell: |
      systemctl restart mysqld
    become: yes

  - name: "Install Pyhon3"
    shell: |
      yum install -y python3 python3-pip
    become: yes

  - name: "Install pymysql"
    pip:
      name: pymysql

  - name: "mysql config"
    mysql_user:
      user: root
      password: "qwer1234"
      host: "localhost" # 원격 접속하고 싶으면 "%"
      login_unix_socket: /var/lib/mysql/mysql.sock
- Playbook 실행
```shell ansible-playbook -i /root/ansible/hosts.yaml /root/ansible/playbook/mysql/mysql-install.yaml
ansible-playbook -i 인벤토리파일경로 플레이북파일경로
#### mysql에 쿼리실행
```shell
vi mysql-query.yaml
mysql-query.yaml
- hosts: ["192.168.197.180"]
  tasks:
  - name: Create user with name 'kjh'
    community.mysql.mysql_user:
      name: kjh
      password: qwer1234
      host: '%'
      priv: '*.*:ALL'
      state: present

  - name: Create a new database with name 'kjh_db'
    community.mysql.mysql_db:
      login_user: root
      login_password: ''
      name: kjh_db
      state: present
  - name: Create new Table
    community.mysql.mysql_query:
      login_user: root
      login_password: ''
      login_db: kjh_db
      query: CREATE TABLE student (sname VARCHAR(10), sage INT)

  - name: Run several insert queries against db test_db in single transaction
    community.mysql.mysql_query:
      login_user: root
      login_password: ''
      login_db: kjh_db
      query:
      - INSERT INTO student VALUES('kim',10);
      - INSERT INTO student VALUES('lee',20);
      - INSERT INTO student VALUES('park',30);
      single_transaction: yes
- Playbook 실행
ansible-playbook -i /root/ansible/hosts.yaml /root/ansible/playbook/mysql/mysql-query.yaml확인(manage03)
mysql -u root -puse kjh_db; select * from student;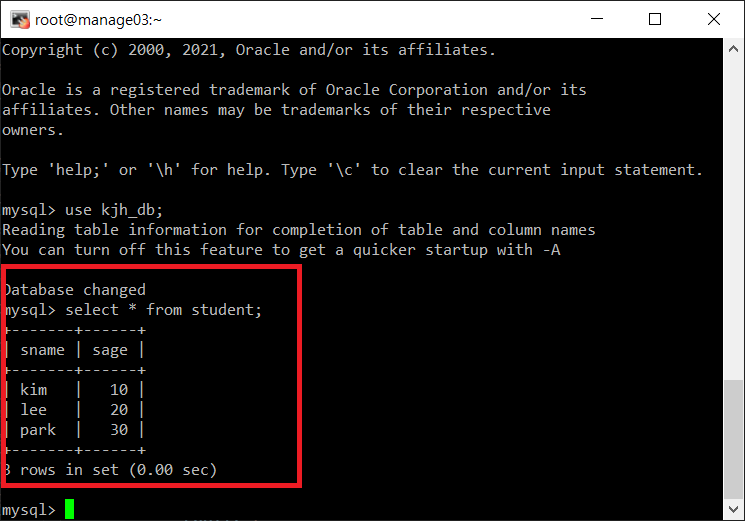
Playbook으로 WAS 생성
Tomcat 설치
mkdir /root/ansible/playbook/was
cd /root/ansible/playbook/was
vi tomcat-install.yaml
tomcat-install.yaml
- hosts: ["192.168.197.170"]
  tasks:
  - name: "Install wget"
    shell: |
      yum update -y
      yum install -y wget
      yum -y install java-1.8.0-openjdk-devel.x86_64
    become: yes

  - name: "Download Toncat"
    shell: |
      wget -O /tmp/apache-tomcat-9.0.68.tar.gz https://dlcdn.apache.org/tomcat/tomcat-9/v9.0.68/bin/apache-tomcat-9.0.68.tar.gz
    become: yes

  - name: "Unarchive Tomcat"
    unarchive:
      src: "/tmp/apache-tomcat-9.0.68.tar.gz"
      dest: "/tmp"
      remote_src: True
    become: yes

  - name: "Move Tomcat"
    shell: |
      mv /tmp/apache-tomcat-9.0.68 /usr/local/tomcat9
    become: yes
ansible-playbook -i /root/ansible/hosts.yaml /root/ansible/playbook/was/tomcat-install.yaml
Tomcat 설정
mkdir template  # 설정한 server.xml, test.jsp 파일 wget을 이용해 집어 넣기
vi tomcat-conf.yaml
tomcat-conf.yaml
- hosts: ["192.168.197.170"]
  tasks:
  - name: "Delete original config file"
    shell: |
      rm -rf /usr/local/tomcat9/conf/server.xml
    become: yes

  - name: "Copy config file"
    copy:
      src: template/server.xml
      dest: /usr/local/tomcat9/conf/server.xml
    become: yes

  - name: "Create Context Dir"
    shell: |
      rm -rf /usr/local/tomcat9/webapps/kjh
      mkdir /usr/local/tomcat9/webapps/kjh
    become: yes

  - name: "Copy jsp file"
    copy:
      src: template/test.jsp
      dest: /usr/local/tomcat9/webapps/kjh/test.jsp
    become: yes

  - name: "Download mysql-connector"
    shell: |
      wget -O /tmp/mysql-connector-java-8.0.19.tar.gz https://dev.mysql.com/get/Downloads/Connector-J/mysql-connector-java-8.0.19.tar.gz
    become: yes

  - name: "Unarchive mysql-connector"
    unarchive:
      src: "/tmp/mysql-connector-java-8.0.19.tar.gz"
      dest: "/tmp"
      remote_src: True
    become: yes

  - name: "Copy mysql-connector"
    shell: |
      cp /tmp/mysql-connector-java-8.0.19/*.jar /usr/local/tomcat9/lib/
    become: yes
ansible-playbook -i /root/ansible/hosts.yaml /root/ansible/playbook/was/tomcat-conf.yaml
Tomcat 실행
vi tomcat-start.yaml
tomcat-start.yaml
- hosts: ["192.168.197.170"]
  tasks:
  - name: "Start Tomcat"
    shell: |
      /usr/local/tomcat9/bin/shutdown.sh
      sleep 5
      nohup /usr/local/tomcat9/bin/startup.sh &
    become: yes
ansible-playbook -i /root/ansible/hosts.yaml /root/ansible/playbook/was/tomcat-start.yaml
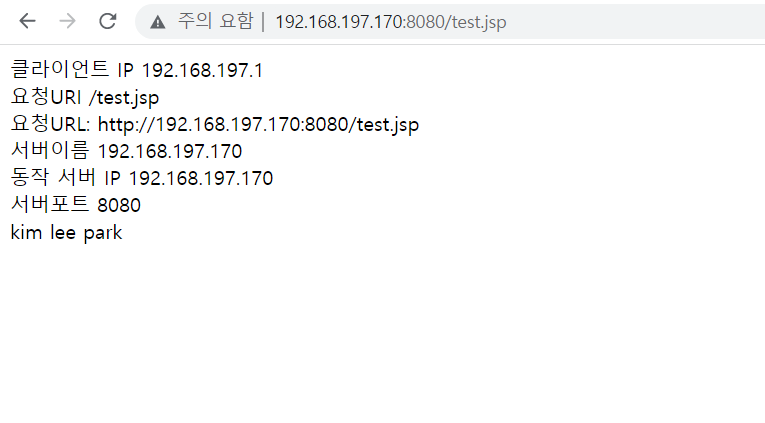
확인
Playbook으로 WEB 설치
Apache 설치
mkdir web
cd web
vi apache-install.yaml
apache-install.yaml
- hosts: ["192.168.197.160"]
  tasks:
  - name: "Insatll httpd server"
    shell: |
      yum update -y
      yum install -y httpd  httpd-devel gcc gcc-c++ wget make redhat-rpm-config
    become: yes

  - name: "Insatll httpd server"
    shell: |
      wget -O /tmp/tomcat-connectors-1.2.48-src.tar.gz https://dlcdn.apache.org/tomcat/tomcat-connectors/jk/tomcat-connectors-1.2.48-src.tar.gz
    become: yes

  - name: "Unarchive tomcat connector"
    unarchive:
      src: /tmp/tomcat-connectors-1.2.48-src.tar.gz
      dest: /tmp/
      remote_src: True
    become: yes

  - name: "Insatll tomcat connector"
    shell: |
      cd /tmp/tomcat-connectors-1.2.48-src/native
      ./configure --with-apxs=/usr/bin/apxs
      make
      cp /tmp/tomcat-connectors-1.2.48-src/native/apache-2.0/mod_jk.so /usr/lib64/httpd/modules/mod_jk.so
      chmod 755 /usr/lib64/httpd/modules/mod_jk.so
    become: yes
ansible-playbook -i /root/ansible/hosts.yaml /root/ansible/playbook/web/apache-install.yaml
apache 설정
mkdir template  # 안에 미리 설정한httpd.conf workers.properties파일을 wget으로 집어넣는다.
vi apache-conf.yaml
apache-conf.yaml
- hosts: ["192.168.197.160"]
  tasks:
  - name: "Delete original conf file"
    shell: |
      rm -rf /etc/httpd/conf/httpd.conf
    become: yes

  - name: "Copy conf file"
    copy:
      src: template/httpd.conf
      dest: /etc/httpd/conf/httpd.conf
    become: yes

  - name: "Copy workers.properties file"
    copy:
      src: template/workers.properties
      dest: /etc/httpd/conf/workers.properties
    become: yes
ansible-playbook -i /root/ansible/hosts.yaml /root/ansible/playbook/web/apache-conf.yaml
apache 실행
vi apache-start.yaml
apache-start.yaml
- hosts: ["192.168.197.160"]
  tasks:
  - name: "Start Httpd"
    shell: |
      systemctl restart httpd
    become: yes
ansible-playbook -i /root/ansible/hosts.yaml /root/ansible/playbook/web/apache-start.yaml